S F Marble & Granite

Marble and Granite

how to clean marble floors

The Ultimate Guide on How to Polish Marble Floors and Tile 

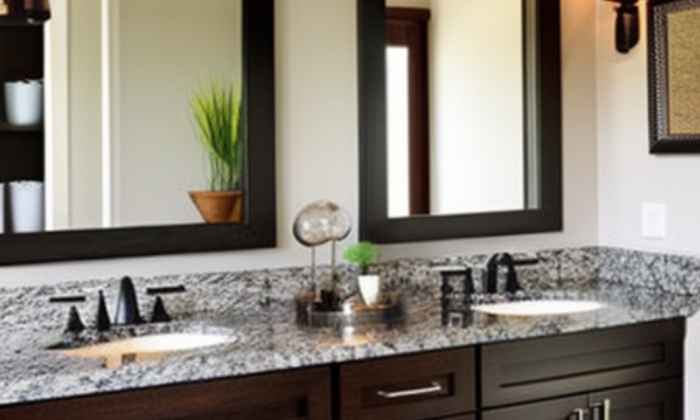
How to Polish Marble Countertops: A Comprehensive Guide Marble countertops are a stunning addition to any home, known for their elegance and timeless beauty. However, like all natural stone surfaces, marble can lose its luster over time due to wear and tear. Regular polishing helps maintain the shine and smoothness of the marble, making it look as good as new. If you’re wondering how to polish marble countertops effectively, this guide will walk you through the entire process, from preparation to post-polishing care. Understanding Marble Countertops Marble is a luxurious and durable natural stone that adds character to kitchens and bathrooms. It is composed primarily of calcium carbonate, which gives it its distinct veining patterns. While marble is known for its beauty, it is also prone to scratches, stains, and dullness due to regular use. That’s where proper care and polishing come in to restore its radiance and extend its lifespan. Polishing marble countertops is a relatively simple task, but it requires the right tools, techniques, and patience. By following the right steps, you can maintain the beauty of your marble and keep it looking vibrant for years to come. Preparing for the Polishing Process Before you begin polishing, it’s essential to prepare the marble surface. This ensures that you remove any dirt, grime, or debris that could hinder the polishing process. Cleaning the Countertop Start by cleaning your marble countertop thoroughly. Use a marble cleaner or a mixture of dish soap and water. Avoid using harsh chemicals, as they can damage the marble surface. Here’s a simple method to clean the marble before polishing: Damp Cloth: Dampen a soft cloth with warm water and mild dish soap. Wipe the Surface: Gently wipe down the countertop to remove any dust, crumbs, or sticky residue. Rinse and Dry: Use a clean, damp cloth to rinse away any soap. Then, dry the surface with a dry cloth or paper towel. After cleaning, inspect the surface for any stains or imperfections that may need extra attention before polishing. Gathering Necessary Tools and Supplies To polish marble countertops effectively, you’ll need the following supplies: Polish Powder: This will restore the shine to the marble surface. Polishing Pad: For applying the polish and buffing the surface. Clean Cloths: A soft, clean cloth to apply and buff the polish. Marble Cleaner: For cleaning the surface before polishing. Baking Soda: If there are stubborn stains or marks that need to be cleaned before polishing. Dust Mop: For sweeping away dust and debris before polishing. Make sure to choose a polish compound that is designed for marble to avoid any damage to the surface. Polishing Steps Now that you’re prepared, it’s time to dive into the polishing process. Here’s a step-by-step guide on how to polish marble countertops: Step 1: Clean the Surface The first step in polishing marble countertops is to thoroughly clean the surface. Dirt, grease, or grime will prevent the polish from adhering properly. Use a marble cleaner or a mixture of warm water and dish soap to clean the surface. Wipe the countertop with a damp cloth, ensuring it’s completely clean and free from any residues. Step 2: Choose and Apply a Marble Polish Once the surface is clean, it’s time to apply the marble polish. There are several types of marble polish available, including liquid polish and polish powder. Follow the instructions on the product for the best results. If you’re using a polish powder, sprinkle it evenly across the marble countertop. If you’re using a liquid polish, pour a small amount directly onto the surface.  Using a polishing pad or a soft cloth, gently rub the polish into the marble surface in a circular motion. Make sure to cover the entire area evenly, focusing on any areas that may have lost their shine. Step 3: Buffing the Marble Once the polish is applied, use a clean, dry soft cloth to buff the surface. Buffing helps to bring out the shine and smoothness of the marble. Work in small sections, applying light pressure to avoid streaks or marks. Continue buffing the marble until the countertop looks cleaned and polished. This step may take a little time, but it’s essential for achieving a glossy, smooth finish. Step 4: Removing Excess Polish After buffing, you may notice some excess polish left on the surface. It’s crucial to remove this to prevent any residue from dulling the shine. Use a clean cloth to wipe away any excess polish, ensuring the countertop is spotless. Post-Polishing Care Now that your marble countertop is polished and gleaming, it’s essential to maintain it properly to keep it looking its best. Sealing the Marble Marble is a porous stone, which means it can absorb liquids and oils, leading to stains. Sealing the marble after polishing helps to prevent staining and maintain the shine. While sealing is not mandatory, it’s highly recommended, especially for marble surfaces in high-traffic areas like kitchens. To seal the marble, apply a marble sealer according to the manufacturer’s instructions. Ensure that the surface is clean and dry before applying the sealer. Allow the sealer to penetrate the surface for the recommended time before wiping off any excess. Daily and Weekly Maintenance Tips To keep your marble countertops in top condition, consider the following maintenance tips: Daily Cleaning: Use a damp cloth and mild soap to wipe down the countertop daily. Avoid using abrasive scrubbing tools that could scratch the surface. Avoid Harsh Chemicals: Always use a marble cleaner specifically designed for natural stone. Avoid acidic cleaners like vinegar, as they can damage the marble. Dust Mops: Regularly use a dust mop to remove dust and debris, preventing it from scratching the surface. By incorporating these maintenance practices, you’ll ensure that your marble countertops stay cleaned and polished for years to come. Professional Help vs. DIY Polishing While DIY polishing is a feasible option, there are some situations where seeking professional help might be a better choice. When to Seek Professional Services If your marble countertop shows

The Ultimate Guide on How to Polish Marble Floors and Tile  Read More »

how to clean marble countertops

How to Clean Marble Countertops

How to Clean Marble Countertops How to clean marble countertops? Marble countertops are a popular choice for many homeowners due to their luxurious appearance and durability. Marble is a natural stone that is formed from limestone, and it is known for its unique veining and color variations. While marble countertops can be a beautiful addition to any home, they need to be cleaned and cared for properly to keep them looking good for a long time. Proper cleaning and care of marble countertops is essential to prevent damage and maintain their appearance. Marble is a porous stone, which means that it can easily absorb liquids and stains. In addition, marble is delicate to acidic foods and drinks like vinegar and citrus, which can scratch the stone’s surface. Therefore, When cleaning marble and granite countertops, it’s critical to follow the advice of cleaning experts and use the proper cleaning supplies and methods. A lot of homeowners like marble worktops because of its opulent appearance and dependability. Marble Countertop Cleaning To clean marble countertops, follow these steps: Gather necessary supplies: Before you begin cleaning, gather all the necessary supplies. You will need a soft cloth, warm water, mild soap, a marble-specific cleaner, and a dry cloth for drying. Wipe the surface with warm water and mild soap to begin: Warm water and mild soap should be used to clean the marble countertop’s surface.. Use a soft cloth to avoid scratching the surface. After washing with soap, rinse the surface with clean water to eliminate any soap residue, and then thoroughly dry it. Dry the surface thoroughly with a dry cloth to prevent any water stains. Polish the surface with a marble-specific cleaner: Once the surface is dry, apply a marble-specific cleaner to the surface. Apply the cleaner evenly to the surface while adhering to the cleaner’s directions using a soft cloth. Avoid using acidic or abrasive cleaners: These cleaners should not be used since they can harm the marble’s surface. Avoid using abrasive cleaners like baking soda or scouring pads, as well as vinegar, lemon juice, and other acidic liquids. By following these steps, you can clean your marble countertops effectively without damaging the surface of the stone. With regular cleaning and upkeep, your marble countertops will stay stunning for many years. What Do You Clean Marble Countertops With? While cleaning marble countertops, it’s essential to use the right cleaning tools to avoid harming the stone’s surface. Here are some tips on what to use and what to avoid: Recommended Cleaning Products Use a pH-neutral cleaner specifically designed for marble. These cleaners are gentle and effective at removing dirt and grime without damaging the stone. Look for cleaners that contain sealer, which can help protect the marble from stains and damage. Microfiber cloths are recommended for wiping down the surface of the marble, as they are gentle and won’t scratch the surface. Avoiding harsh chemicals and acidic cleaners Avoid using harsh chemicals, such as bleach or ammonia, on marble countertops. These chemicals can etch the surface of the marble and cause it to lose its shine. Avoid using acidic cleaners, such as vinegar or citrus, as these can also damage the surface of the stone. Avoid using harsh cleaning tools like steel wool or scouring pads since they can damage the marble’s surface. Natural Cleaning Alternatives If you prefer to use natural cleaning products, there are several options that are safe for marble countertops. A solution of warm water and mild dish soap can be effective at cleaning marble surfaces without causing damage. A paste made of baking soda and water can be used to help clean the marble’s surface of dirt and stains. How to Clean Marble Countertop Stains Because marble is a porous material that readily absorbs stains, it is crucial to deal with any stains as soon as they appear on a black marble countertops. Here are the steps to clean marble countertop stains: Determining stain types: You must first determine the sort of stain that is on a marble countertop in order to remove it successfully. Common types of stains on marble countertops include oil-based stains, water stains, and organic stains such as coffee or wine.The kind of poultice you need to apply to remove the stain depend on the stain’s nature. Making and using a poultice: A poultice is a mixture of a cleaning chemical and a thickening agent, like flour or baking soda, that is applied to the stain and allowed to sit for a while. Apply the poultice to the stain, making sure to cover it completely.Depending on how severe the stain is, wrap the poultice in plastic and leave it on for several hours or overnight. Allowing the poultice to dry and removing it: Remove the plastic wrap after the poultice has dried, then use a plastic scraper or spatula to remove the poultice. Warm water should be used to wash and dry the countertop. You might need to apply the poultice again if the stain is still obvious. Marble Countertop Care Preventative maintenance, basic cleaning, and expert cleaning and restoration solutions are all part of the marble countertop care process. Let’s explore these points in more detail: Preventative Measures to Avoid Damage To prevent damage to marble countertops, it is important to take certain preventative measures. For example: Use cutting boards and avoid placing hot pots or pans directly on the surface of the countertop. Clean up spills immediately to prevent stains from setting in. Use coasters or placemats to prevent scratches from dishes and glasses. On the countertop, stay away from acidic items like vinegar and lemon juice. To safeguard the marble and increase its resistance to stains and damage, use a high-quality sealer. Regular Maintenance and Cleaning Routine Regular maintenance and cleaning of marble countertops is essential to keep them looking their best. The following advice can help you maintain and clean your marble countertops: Use a gentle cloth and warm water to frequently clean the countertop. Use a mild soap

How to Clean Marble Countertops Read More »

mexican tile backsplashes

Best Mexican Tile Backsplashes for Kitchen Upgrades

Best Mexican Tile Backsplashes for Kitchen Upgrades Home Mexican tile backsplashes are becoming increasingly popular in kitchen designs due to their unique and beautiful appearance. These tiles come in a wide range of colors, patterns, and styles, making them a versatile choice for any kitchen.  In this post, we will cover different types of Mexican tile backsplashes, their features, advantages, and care and maintenance tips.In Mowell, MA, one of the best company is SF Marble and Granite Countertops services. Types of Mexican Tile Backsplashes Mexican tile backsplashes can be classified into various types, including: Hand-painted Mexican tile backsplashes are handcrafted by artisans who use traditional methods to create beautiful designs on each tile. They are available in various colors and patterns, making them a popular choice for kitchen backsplashes. Some design ideas for hand-painted Mexican tile backsplashes include: Floral patterns Geometric shapes Spanish colonial designs Authentic Mexican Tile Backsplashes Authentic Mexican tile backsplashes are made from materials that are native to Mexico, giving them a unique and traditional look. They come in various styles and colors and are available in both matte and glossy finishes. Features of Authentic Mexican Tiles include: Handmade and unique Durable and long-lasting Non-slip surface Resistant to water and stains Colorful Mexican Tile Backsplashes Colorful Mexican tile backsplashes are available in a wide range of colors and patterns, making them a popular choice for homeowners who want to add a pop of color to their kitchen. They are available in both traditional and modern designs. Some of the advantages of using colorful Mexican tiles include: Easy to clean and maintain Resistant to heat and moisture Long-lasting and durable Adds a unique touch to your kitchen Mexican Talavera Tile Backsplashes Mexican Talavera tile backsplashes are handcrafted in Mexico and are known for their colorful and intricate designs. They are made from clay and are available in both glossy and matte finishes. Some design ideas for Mexican Talavera tile backsplashes include: Sunburst patterns Floral designs Geometric shapes Rustic Mexican Tile Backsplashes Rustic Mexican tile backsplashes are popular for their unique and traditional look. They are available in earthy colors and are made from natural materials such as clay and terracotta. Features of Rustic Mexican Tiles include: Non-slip surface Resistant to water and stains Durable and long-lasting Adds a touch of rustic charm to your kitchen Traditional Mexican Tile Backsplashes Traditional Mexican tile backsplashes are known for their intricate designs and traditional look. They are available in various styles and colors and are a popular choice for homeowners who want to add a touch of Mexico to their kitchen. Some design ideas for traditional Mexican tile backsplashes include: Aztec patterns Spanish colonial designs Floral motifs Materials Used in Mexican Tile Backsplashes: Mexican tile backsplashes are made from various materials, including: Clay: Clay tiles are made from natural clay and are popular for their unique and rustic appearance. Terracotta: Terracotta tiles are made from natural clay and are known for their earthy colors and durability. Ceramic: Ceramic tiles are made from clay and are available in various colors and finishes. Advantages of Mexican Tile Backsplashes Mexican tile backsplashes offer numerous advantages, including: Versatility: Mexican tiles come in a wide range of colors, patterns, and styles, making them a versatile choice for any kitchen. Durability: Mexican tiles are durable and long-lasting, making them an excellent investment for your home. Easy to clean: Mexican tiles are easy to clean and maintain, making them a practical choice for a kitchen backsplash. Adds value to your home: Mexican tiles can add value to your home and enhance its overall appearance. Care and Maintenance Tips for Mexican Tile Backsplashes To keep your Mexican tile backsplash looking beautiful, follow these care and maintenance tips: Clean regularly: Regular cleaning will prevent dirt and grime from building up on the tiles. Use a mild soap and warm water to clean the tiles. Avoid harsh chemicals: Harsh chemicals can damage the tiles’ surface, so avoid using them when cleaning your backsplash. Seal the tiles: Sealing your Mexican tiles will protect them from moisture and stains and keep them looking new for longer. Avoid direct heat: Direct heat can damage the tiles, so avoid placing hot pots or pans directly on the backsplash. Repair any damage: If you notice any damage to your Mexican tile backsplash, such as cracks or chips, repair them as soon as possible to prevent further damage. Transform Your Kitchen with Artistic Backsplash Installations Elevate your kitchen with our expert design and installation services. Enjoy the perfect blend of vibrant color and traditional craftsmanship with professional Backsplash Installation in Lowell. At SF Marble & Granite Inc., every project is treated with personal care to create a warm, inviting space that reflects your unique style. Conclusion Mexican tile backsplashes are an excellent choice for homeowners who want to add a touch of tradition and style to their kitchen. With their unique designs, versatile styles, and durable materials, Mexican tiles offer numerous advantages that make them a practical and beautiful choice for a kitchen backsplash.  By following the care and maintenance tips outlined in this post, you can keep your Mexican tile backsplash looking beautiful for years to come. Schedule a time with SF Marble and Granite to get best services. FAQs about White Marble Floor Tiles Are White Marble Floor Tiles Durable? Yes, white marble floor tiles are known for their durability and can last for many years with proper care and maintenance. However, the durability of various marble types varies, therefore it’s crucial to pick a marble tile that is suitable for the intended application. How Do I Clean White Marble Floor Tiles? To clean white marble floor tiles, use a mild, pH-neutral cleaner and a soft mop or cloth. Avoid using abrasive or acidic cleaners, as these can damage the marble surface. It’s also important to wipe up spills and stains immediately to prevent staining. Can I Customize The Size And Shape Of My Granite Bar Top? White marble floor tiles can be slippery when

Best Mexican Tile Backsplashes for Kitchen Upgrades Read More »

granite floor tiles

Granite Floor Tiles: Durability, Affordability, and Style

Granite Floor Tiles: Durability, Affordability, and Style When it comes to choosing a flooring material for your home or office, granite floor tiles are a popular choice. Known for their durability, affordability, and stylish designs, granite floor tiles have become a go-to option for many homeowners and designers.    In this blog post, we will discuss the benefits of granite floor tiles and the various options available. In Mowell, MA, SF marble and granite provides the best marble flooring and granite countertops services. Durability Of Granite Floor Tiles One of the key benefits of granite floor tiles is their durability. Granite is a natural stone that is known for its strength and longevity. Here are some of the features that make granite floor tiles durable: Hardness: Granite is one of the hardest natural stones, making it resistant to scratches, dents, and other types of damage. Resistance to moisture: Granite has a low porosity, which means it doesn’t absorb moisture easily. This makes it an ideal flooring material for areas that are prone to spills and moisture, such as kitchens and bathrooms. Heat resistance: Granite can withstand high temperatures, making it suitable for areas with heat sources, such as fireplaces and radiant heating systems. Affordability Of Granite Floor Tiles Contrary to popular belief, granite floor tiles can be an affordable flooring option. While there are luxury granite options available that can be quite expensive, there are also affordable options that offer the same benefits. Here are some factors that affect the cost of granite floor tiles: Grade: Granite is graded based on its quality, with higher grades being more expensive. However, lower grade granite can still be a durable and affordable option. Thickness: Thicker granite floor tiles are more expensive than thinner ones. Finish: The finish of the granite can affect its price, with polished finishes being more expensive than honed or flamed finishes. Large Format Granite Floor Tiles Large format tiles are becoming increasingly popular in the flooring industry, and granite floor tiles are no exception. Large format tiles are defined as tiles that are larger than 12×12 inches.  Here are some benefits of large format granite floor tiles: Fewer grout lines: Large format tiles have fewer grout lines, which can make a space appear larger and more streamlined. Easy maintenance: With fewer grout lines, large format tiles are easier to clean and maintain. Modern look: Large format tiles can give a space a modern and sophisticated look. Non-Slip Granite Floor Tiles Safety is a crucial consideration when choosing a flooring material, especially in areas that are prone to moisture or spills. Here are some features that make granite floor tiles non-slip:   Texture: Granite floor tiles can be finished with a textured surface, which can provide better traction and prevent slips and falls. Polished finish: While polished granite can be slippery when wet, it can be treated with a slip-resistant coating to enhance its slip resistance. Honed finish: Honed granite has a matte finish that can provide better traction than polished granite. Stylish Granite Floor Tile Designs Tiles of granite installation are available in a variety of styles and colors, making them a versatile flooring option. Here are some popular design options: Solid colors: Solid-colored granite floor tiles can provide a sleek and modern look to a space. Speckled or flecked: Granite with speckled or flecked patterns can add depth and texture to a space. Veined: Granite with veined patterns can provide a dramatic and elegant look to a space. Custom designs: Granite floor tiles can be customized with patterns, colors, and shapes to fit any design aesthetic. Conclusion It’s important to consider factors such as durability, affordability, slip resistance, and design options. By doing so, you can select the best granite floor tile for your needs and enjoy its benefits for years to come. When installing granite floor tiles, it’s essential to hire a professional installer who has experience working with natural stone. Proper installation can ensure that the tiles are level, stable, and durable, and prevent problems such as cracking or shifting. Contact us to get the best granite floor installation services. FAQs about Granite Floor Tiles How Durable Are Granite Floor Tiles? Granite floor tiles are known for their durability. They are resistant to scratches, dents, and other types of damage. Additionally, they have a low porosity, making them resistant to moisture and suitable for high traffic areas Are Granite Floor Tiles Affordable? Yes, there are affordable options available for granite floor tiles. The cost of granite floor tiles can vary depending on factors such as grade, thickness, and finish. Lower grade granite and thinner tiles can be a more affordable option, while polished finishes can be more expensive. Are Granite Floor Tiles Slippery? Granite floor tiles can be slippery when wet, especially if they have a polished finish. However, they can be treated with a slip-resistant coating or finished with a textured surface to enhance their slip resistance. What Design Options Are Available For Granite Floor Tiles?  Granite floor tiles are available in a variety of design options, including solid colors, speckled or flecked patterns, veined patterns, and custom designs. This makes them a versatile flooring option that can fit any design aesthetic. Are Granite Floor Tiles Environmentally Friendly? Granite is a natural stone that is mined from the earth, and its production process has a relatively low environmental impact. Additionally, granite floor tiles can be recycled or reused at the end of their life, reducing waste in landfills Our Services Backsplashes Granite Repair Granite Fabrication Granite Installation Swimming Pool Tile Countertops Installation Marble Floor Installation Contact Us 755 Dutton St. Lowell-MA 01854 Phone: 978-459-5823 FAX: 978 459 5827 smgranite@hotmail.com Our Blogs How Do You Clean Quartz Countertops Like a Pro? Expert Tips Revealed How Do You Clean Quartz Countertops Like a Pro? Expert Tips Revealed How do you… Read More January 14, 2025 Top 10 Most Popular Granite Colors of 2024 Top 10 Most Popular Granite Colors of 2024 Granite Colors have long

Granite Floor Tiles: Durability, Affordability, and Style Read More »

shower floor tile repair

Shower Floor Tile Repair: Everything You Need to Know

Shower Floor Tile Repair: Everything You Need to Know A shower is an essential part of our daily routine, and it is crucial to have a well-functioning shower floor to avoid any inconvenience. The shower floor is prone to damage due to constant exposure to water, soap, and other elements, leading to issues like cracks, leaks, and discoloration. These problems not only affect the overall appearance of the shower but can also pose a safety risk for users. That is where shower floor tile repair comes in. Repairing the shower floor tiles is essential to ensure that the shower remains functional and safe. This repair process involves addressing the issues with the tiles, restoring their appearance and function, and preventing further damage. In this article, we will explore various aspects of shower floor tile repair, including the tools and materials needed, the cost of repair, and how to find the right professionals for the job. For these treatments, you must contact SF Marble Flooring & Granite Countertops for best services. What is A Floor Tile Repair Kit A floor tile repair kit is a comprehensive solution for repairing damaged tiles on your shower floor. These kits typically contain everything you need to complete a repair, including epoxy, grout, putty, cleaning solution, and a scraper. The contents of the kit may vary based on the manufacturer and the type of repair needed. Using a repair kit has several benefits. Firstly, it is a cost-effective solution compared to hiring a professional. Secondly, it is a quick fix that can be done in a matter of hours, depending on the severity of the damage. Lastly, it is a DIY solution that allows you to take control of the repair process and avoid any inconvenience caused by having to wait for a professional to arrive. Here is a step-by-step guide on how to use a floor tile repair kit: Clean the damaged area thoroughly using the cleaning solution provided in the kit. Prepare the epoxy mixture by mixing the two-part epoxy as per the instructions provided. Apply the epoxy mixture to the damaged area and use the scraper to level it out evenly. Give the epoxy the necessary length of time to dry. Mix the grout or putty and apply it over the epoxy, ensuring that it blends in with the surrounding tiles. Allow the grout/putty to dry for the recommended amount of time. Clean any excess residue or grout using the scraper or a damp cloth. With these simple steps, your shower floor tiles will be looking as good as new in no time! Floor Tile Repair Service Near Me While a DIY repair kit can be a quick and cost-effective solution for minor shower floor tile damage, more severe issues such as leaks or extensive cracks require the expertise of a professional. Hiring a professional for shower floor tile repair ensures that the problem is fixed correctly, preventing further damage and ensuring the safety of users. To find the right repair service near you, start by doing research online. Look for businesses in your area that offer shower floor tile repair services and check their reviews and ratings.Additionally, you can ask for recommendations from friends, family, or colleagues who have had similar repairs done in the past.There are several top-rated companies in the Lowell-MA area that offer shower floor tile repair services. Here are some notable companies that stand out: SF Marble and Granite – SF Marble and Granite is a reputable company that offers a wide range of services, including shower floor tile repair. With over decades  of experience, we have built a solid reputation for our high-quality work and exceptional customer service. Our team of experts uses top-of-the-line materials and equipment to ensure a lasting repair. The Grout Medic – The Grout Medic is another highly rated company that specializes in grout and tile cleaning and repair. Their team of professionals uses a proven process to clean and repair shower floor tiles, ensuring that the repaired area looks as good as new. Granite State Tile – Granite State Tile is a well-established company that offers a wide range of services, including shower floor tile repair. Their team of professionals uses state-of-the-art tools and techniques to ensure a high-quality repair that is both durable and aesthetically pleasing. Among these top-rated companies, SF Marble and Granite stands out for our exceptional customer service and high-quality work. We use best materials and equipment to ensure a lasting repair that exceeds our customers’ expectations. When choosing a repair service, consider the following factors: Experience: Look for a company with several years of experience in repairing shower floor tiles. An experienced professional will have the knowledge and skills to handle any issue that may arise during the repair process. Licensing and insurance: Ensure that the repair service you choose is licensed and insured. This protects you from liability in case of any accidents or damage during the repair process. Reputation: Choose a repair service with a good reputation in your area. Check their ratings and reviews online, and ask for references to ensure their reliability and quality of work. Cost: Compare the cost of repair services offered by different companies to find one that fits your budget. Be wary of companies that offer extremely low prices, as they may be cutting corners and using subpar materials. By considering these factors and doing thorough research, you can find the right repair service near you to fix your shower floor tile issues quickly and efficiently. Leaking Shower Floor Tile Repair Leaking shower floor tiles can cause significant damage to your bathroom and home if not addressed promptly. Some common causes of leaking shower floor tiles: Grout deterioration: Over time, the grout between your shower floor tiles can wear away or crack, allowing water to seep through and cause damage. Cracks in tiles: If your shower floor tiles have cracks, they can allow water to seep through and cause leaks. Improper installation: If your shower floor tiles were not installed correctly, they may not be

Shower Floor Tile Repair: Everything You Need to Know Read More »

White marble flooring

Ultimate Guide to White Marble Flooring: What You Need to Know

Professional White Marble Flooring Installation and Repair Services in Lowell Home If you’re looking to elevate the elegance of your home or office, white marble flooring is the perfect choice. SF Marble & Granite is specialized in offering high-quality marble flooring installation and repair services in Lowell. With years of expertise, we ensure that your space reflects sophistication and luxury. Whether you’re looking to install white marble floors in your kitchen, living room, or bathroom, or repair existing flooring, our team has you covered. Let’s explore why marble flooring is a timeless option and how our services can transform your space. Why Choose White Marble Flooring? Aesthetic Appeal Marble flooring exudes a clean, bright, and classic look that enhances any room. Its smooth texture and polished surface reflect light, making rooms appear more spacious and inviting. Whether you’re designing a modern or traditional space, the allure of white marble floor tiles brings unmatched elegance. Its neutral tones make it a versatile option for complementing various interior styles. Luxury and Status Symbol Marble has always been associated with luxury and status. Installing white marble floors adds a sense of sophistication and grandeur to your space. Whether you’re aiming to create a high-end kitchen, bathroom, or living area, white marble sets the tone for a luxurious experience. Natural Variation Each piece of white marble is unique, featuring its own natural veining patterns and subtle color variations. From delicate gray streaks to intricate swirls, these natural variations ensure that no two marble floors look the same. This one-of-a-kind appeal makes white marble flooring highly desirable for homeowners who want to personalize their space with natural beauty. Versatility One of the most significant advantages of white marble is its versatility. Whether your home has a modern, contemporary design or a more classic, traditional feel, white marble seamlessly integrates into any decor. Its neutral tones complement various color schemes, and its timeless appeal makes it suitable for bathrooms, kitchens, living rooms, and even commercial spaces. Popular Types of White Marble for Flooring We Offer We offer a range of exquisite white marble options to suit different design preferences. Here are some of the most popular types of white marble floor options we provide: Carrara Marble: Known for its soft gray veining, Carrara marble is one of the most popular choices for flooring due to its subtle yet luxurious appearance. Calacatta Marble: Calacatta marble features bold, dramatic veining patterns and is often considered a more high-end option due to its rarity and distinctiveness. Statuario Marble: With its striking white backdrop and sharp gray veins, Statuario marble exudes elegance and is ideal for creating a statement floor. Thassos Marble: This pure white marble with minimal veining is perfect for those looking to achieve a sleek, contemporary look. Bianco Lasa Marble: Known for its soft beige undertones and subtle veins, Bianco Lasa is a versatile option that works well in both modern and traditional settings. Our White Marble Flooring Installation Services We take pride in delivering flawless marble floor installation services. Here’s how we ensure a smooth, seamless process: Consultation and Planning Our process begins with an in-depth consultation to understand your vision and design preferences. We help you select the right type of white marble tiles that best suit your space, from kitchen floors to bathroom walls. We also take accurate space measurements to ensure the best results. Preparing the Surface Proper surface preparation is key to a long-lasting marble floor. We carefully level and prepare the subfloor to prevent future issues such as cracking or unevenness. This critical step ensures your white marble floor remains beautiful and durable for years to come. Precision Cutting and Laying Using advanced tools and techniques, our skilled craftsmen cut and lay the white marble floor tiles with precision. This attention to detail ensures a seamless installation with minimal visible joints, creating a sleek, polished look. Grouting and Sealing Once the tiles are installed, we expertly grout and seal the floor to protect against stains and moisture. Sealing is essential to maintain the marble’s natural beauty and prevent damage over time. Post-Installation Care Tips We provide detailed guidance on how to care for your new white marble floors. Simple practices, such as using a pH-neutral cleaner and avoiding harsh chemicals, will help maintain the marble’s natural sheen. We also recommend regular resealing to protect your investment. White Marble Flooring Repair and Restoration Services Over time, even the most well-maintained white marble floors may show signs of wear. We offers professional repair and restoration services to bring your marble floors back to life. Common Issues with White Marble Floors Common issues with marble floors include chips, cracks, dullness, and etching caused by acidic substances. Over time, grout lines can also become worn, affecting the overall look of the floor. Expert Repair Solutions Our expert repair services include patching chipped or cracked marble, re-polishing to restore shine, and resealing to protect against future damage. We use top-quality materials to match the original white marble tiles as closely as possible, ensuring a seamless repair. Stain and Scratch Removal We specialize in removing stains and scratches from polished marble surfaces. Whether it’s a kitchen spill or bathroom moisture stain, our restoration techniques will eliminate discoloration, restoring the floor’s pristine condition. Resealing and Regrouting Maintaining the seal on white marble floors is crucial for long-term durability. We offer professional resealing services to prevent moisture infiltration and wear. Regrouting services are also available to refresh the appearance of your marble tiles, keeping them looking as good as new. Transform Your Space with White Marble Flooring in Lowell Elevate your home’s elegance with our expert Marble Floor Installation in Lowell. At SF Marble & Granite Inc., we specialize in crafting timeless white marble floors that blend luxury with durability. Our meticulous installation process ensures each tile is perfectly placed, enhancing the natural beauty of the stone. Whether you’re renovating your kitchen, bathroom, or living area, our white marble flooring solutions add a touch of sophistication to any

Ultimate Guide to White Marble Flooring: What You Need to Know Read More »

Marble texture

Marble Texture Magic: How to Create Illusions with Patterns and Colors

Marble Texture Magic: How to Create Illusions with Patterns and Colors Marble texture has been a timeless classic in the world of interior design for centuries. This elegant and luxurious material adds sophistication to any space, making it a popular choice for homeowners and interior designers alike. From kitchen countertops to bathroom tiles, the versatility of marble texture is undeniable. Marble is a type of metamorphic rock that is formed from limestone. It is typically composed of calcium carbonate and other minerals that give it its distinctive colors and patterns. Marble is found all over the world, but some of the most famous marble quarries are located in Italy, Greece, and Turkey. The purpose of this article is to provide readers with a comprehensive guide to creating realistic marble textures using a variety of colors, including black, white, grey, and brown. We will also cover techniques for creating seamless and high resolution textures, as well as tips for using marble textures in different design applications. Whether you’re a  interior designer, this article will provide you with the tools and knowledge you need to incorporate marble texture into your designs. Contact SF Marble Flooring  & Granite countertops if you want to make your house appear classy. Black Marble Texture Black marble texture is a stunning and versatile design element that can add depth and sophistication to any project. Here are some key characteristics and techniques for creating a realistic black marble texture: Characteristics: Black marble texture is characterized by its dark color and unique patterns, which can range from simple veins to intricate swirls and knots. It is a popular choice for creating a modern and sleek look. Creating Realistic Texture: Start with a base color of black or dark grey, and use a brush tool to add lighter and darker tones to create the veining and pattern of the marble. Use a noise filter to add depth and create a more realistic texture. You can also use a photograph of real black marble as a reference to recreate the texture using digital tools. Applications in Design: Black marble can be used in a variety of design applications, such as interior design for flooring, countertops, and backsplashes. It can also be used in graphic design and web design to create a unique and eye-catching visual. Tips for Designing with Black Marble Texture: Use black marble in moderation and balance it with other design elements. Pair it with metallic accents, such as gold or silver, to create a luxurious and elegant look. Overall, black marble texture is a powerful design element that can add impact and sophistication to your projects. With these techniques and tips, you can create stunning visuals that will capture attention and leave a lasting impression. White Marble Texture White marble texture is a beautiful and elegant design element that can elevate any project. Here are some key points to consider: White marble texture is characterized by its light color and subtle veining, making it a timeless and classic option. To create a realistic white marble texture, use a base color of white or off-white and add soft, subtle veins in shades of grey or light brown using a brush tool. Filters like noise or grain can also add texture. White marble texture is versatile and can be used in a variety of applications, such as interior design, graphic design, and web design. When using white marble texture, it’s important to balance it with other design elements to avoid overpowering the overall aesthetic. Pairing it with darker colors or bold patterns can create a more dynamic design. White marble texture is a timeless design element that will never go out of style, making it a great investment for any project. By incorporating it into your designs with care, you can create stunning and impactful visuals that will leave a lasting impression. Contact with us at SF Marble & Granite if you want to make your home appear elegant. Marble Texture Seamless Seamless textures are design elements that can be repeated infinitely without any visible seams or edges. These textures are a popular choice in web design, graphic design, and 3D modeling due to their versatility and ease of use. They can be scaled and repeated without any loss of quality, making them highly desirable for creating realistic and immersive visuals. When it comes to using seamless marble texture in design, there are many applications. In interior design, seamless marble textures can be used for wallpaper, flooring, and tiles to create a seamless and cohesive look. When using seamless marble texture in design, it’s important to consider the scale and proportion of the texture. A larger texture may be more appropriate for larger design elements, while a smaller texture may work better for more subtle accents. Additionally, you can play with the color and saturation of the texture to create different effects and moods in your design. Seamless marble textures are a powerful design element that offers versatility, ease of use, and endless possibilities. By using the right techniques and incorporating them into your designs with care, you can create stunning visuals that are both seamless and impactful. Points to be noted about Marble Textures Seamless: Seamless textures can be repeated infinitely without visible seams or edges They are versatile and can be used in web design, graphic design, and 3D modeling Marble textures can be created by using a seamless texture tool, cropping a larger texture, or using a texture generator They can be used for wallpaper, flooring, tiles, or as a background element in design Scale and proportion should be considered when using marble textures in design Color and saturation can be adjusted to create different effects and moods in your design. Grey Marble Texture Grey marble texture is a highly sought-after design element due to its elegant and sophisticated appearance. Here are some characteristics of grey marble texture: Neutral color: Grey marble texture has a neutral color that pairs well with a variety of other design elements. Subtle veins: Grey marble texture typically has subtle veins in shades of white or light grey that add depth and texture to the design. Varied patterns: Grey marble

Marble Texture Magic: How to Create Illusions with Patterns and Colors Read More »

Bathroom Granite Countertops

Expert Bathroom Granite Countertop Installation Service

Expert Bathroom Granite Countertop Installation Service Installing a bathroom granite countertop can transform your space into a stylish and functional area. This step-by-step guide will walk you through the entire process, from choosing the right granite slab to securing the sink and applying the final touches. Granite countertops for bathroom vanities are an excellent choice due to their durability, elegance, and wide range of color options. Let’s dive into why granite is such a popular material for bathroom vanity tops and the steps to install one in your home. Why Choose Granite for Your Bathroom Countertop? When selecting a countertop material for your bathroom vanity, granite is a top contender. Here are some of the reasons granite countertops are favored for bathroom vanities: Durability: Granite is incredibly resistant to scratches, stains, and heat, making it ideal for a bathroom environment. Natural Beauty: Granite slabs offer stunning natural stone patterns that add elegance to any bathroom design. Low Maintenance: Once properly sealed, granite requires minimal upkeep to keep it looking pristine. Variety of Colors: Granite is available in a wide range of colors and patterns, allowing you to choose one that complements your bathroom’s design. Tools and Materials You’ll Need for Installation Before you begin installing your bathroom granite countertop, gather the necessary tools and materials: Measuring tape Level Adhesive (specifically for stone countertops) Caulk and caulking gun Granite sealant Circular saw with a diamond blade (if cutting is needed) Sink (undermount or drop-in) Silicone adhesive for sink attachment Cleaning cloths Bathroom Granite Countertop Installation Process Measuring and Preparing the Space Proper measurement is crucial to ensure your bathroom granite countertop fits perfectly. Begin by using a measuring tape to measure the length, width, and depth of your bathroom vanity, making sure to leave room for any overhangs. If you’re installing an undermount sink, determine its position and mark it for cutting out the space in the granite slab. Next, check the vanity surface for leveling by using a level tool; if it’s uneven, adjust it with shims. Finally, if you’re replacing an existing countertop, carefully remove it without damaging the vanity. Preparing the Granite Slab Once your space is measured and prepped, the next step is to prepare the granite slab for installation. If necessary, use a circular saw with a diamond blade to make any cuts to the granite, ensuring you wear protective gear throughout the process. If the slab doesn’t come with pre-cut spaces for the sink and faucet, carefully measure and cut these openings, making sure everything fits properly. After completing the cuts, smooth the edges using a polishing tool to achieve a polished, finished look that enhances the overall appearance of the granite. Placing and Securing the Granite Countertop Now that your granite slab is prepped, it’s time to secure it onto the vanity. Begin by applying a layer of adhesive specifically designed for natural stone onto the top of the vanity. Carefully lower the granite slab onto the surface, ensuring it aligns perfectly with the sink and faucet cutouts. Once positioned, check for leveling using a level tool, making any necessary adjustments to ensure the countertop is even. Finally, let the adhesive set and dry completely to form a strong bond between the vanity and the granite slab. Installing the Sink Whether you’re installing an undermount or drop-in sink, start by attaching the sink. For undermount sinks, apply silicone adhesive around the edges and carefully position it beneath the countertop, while for drop-in sinks, simply lower the sink into the cutout. Once the sink is positioned, ensure it is securely attached to the granite, using clamps or brackets for additional support if needed while the adhesive dries. After securing the sink, apply caulk around its edges to seal it, preventing water from seeping underneath and causing potential damage. Sealing the Granite Sealing your bathroom granite countertop is essential for maintaining its longevity. Granite is a porous natural stone, which means it can absorb water and stains if not properly sealed. Applying a sealant helps protect the surface from damage, preserving its beauty and functionality. To apply granite sealant, first clean the surface thoroughly and then apply the sealant in even strokes. Allow it to sit for the recommended time before wiping off any excess. To ensure continued protection, reseal the countertop every one to two years, depending on its usage and wear. Final Touches After the granite countertop and sink are securely in place, it’s time to complete the final steps, which include installing the faucet and plumbing fixtures, ensuring everything is secure and leak-free. Then, apply caulk around the edges of the countertop to create a waterproof seal between the vanity and the wall. Finally, clean the granite by wiping down the countertop with a soft cloth to remove any dust, adhesive residue, or fingerprints, leaving the surface spotless and ready for use. Cost To Install Granite Countertops In Bathroom The cost to install granite countertops in a bathroom can vary significantly based on several factors, including the size of the countertop, the type of granite chosen, the complexity of the installation, and the region where you live. Here’s a breakdown of the costs associated with installing granite countertops in a bathroom: Material Costs Granite Slabs: The cost of granite slabs typically ranges from $40 to $100 per square foot. Exotic or rare granite colors can go higher, up to $200 per square foot. Granite Tiles: If you opt for granite tiles instead, the price can be around $5 to $15 per square foot, making it a more budget-friendly option. Labor Costs Labor costs for installing granite countertops can range from $30 to $100 per hour, depending on the complexity of the job and the contractor’s experience. The average installation cost is often $50 to $75 per square foot for labor. Additional Costs Fabrication: If the granite needs to be cut or shaped, fabrication costs can add another $15 to $40 per square foot. Sink Installation: Installing a sink (especially an undermount sink)

Expert Bathroom Granite Countertop Installation Service Read More »

limestone blocks

Limestone Blocks: A Guide to Understanding their Benefits and Uses

Limestone Blocks: A Guide to Understanding their Benefits and Uses Limestone blocks are cut from large pieces of limestone, making them a durable and versatile building material that has been used for centuries in construction and architectural applications. Limestone is a sedimentary rock composed mainly of calcium carbonate, which is formed over millions of years through the accumulation of shells, coral, and other organic materials. S F Marble and Granite is one of the leading suppliers of limestone blocks, offering a wide range of sizes, shapes, and colors to suit any project. Their commitment to quality and customer service makes them a trusted source for all your limestone block needs. Limestone Blocks for Sculpting For artists and sculptors, limestone blocks offer a unique canvas to create their masterpieces. Its softness and ease of carving make it a popular choice for sculptors. Whether it is a large-scale monument or a smaller piece of art, limestone is a great material to work with. Its natural beauty and timeless look add character to any artwork. Manufactured Limestone Blocks In addition to natural limestone blocks, there are also manufactured options available. These blocks are made from crushed limestone and are molded into different shapes and sizes. Manufactured limestone blocks offer a uniform look, which is ideal for projects where a specific size and shape are required. They are also available in a wide range of colors, making it easy to match them to the existing decor. Cut Limestone Blocks For projects that require custom sizes or shapes, cut limestone blocks are the perfect solution. This type of block is cut to size and can be shaped to meet your specific needs. Cut limestone blocks are available in a variety of thicknesses, making it easy to find the perfect size for your project. Whether you need a small piece for a repair or a large block for a new construction project, cut limestone blocks offer the versatility you need. Large Limestone Blocks Large limestone blocks are a popular choice for outdoor projects, such as retaining walls, garden beds, and walkways. The size and weight of these blocks make them ideal for creating a solid foundation and providing stability to your project. They are also easy to stack and arrange, making it easy to create a custom design. Limestone Blocks for Sale If you are looking for limestone blocks for sale, there are many suppliers and distributors available. You can find these blocks at local home improvement stores, rock quarries, and online retailers. When shopping for limestone blocks, be sure to consider the type, size, and thickness of the block, as well as the location of the supplier, to ensure that you find the right product for your project. Contact us if you wish to purchase limestone blocks. Limestone Blocks Near Me If you are looking for limestone blocks for your project, there are many suppliers and distributors near you. Simply search for “limestone blocks near me” and you will find a list of companies that offer this product. You can also visit local home improvement stores or rock quarries to see the different types of limestone blocks they have available. Cost of Limestone Blocks The cost of limestone blocks varies depending on the type and size of the block, as well as the location of the supplier. Natural limestone blocks tend to be more expensive than manufactured blocks, but they also offer unique beauty and character that cannot be found in other materials. The cost of cut limestone blocks may also be higher than standard blocks, due to the added cost of custom cutting and shaping. Conclusion limestone blocks offer a unique combination of durability, versatility, and natural beauty that make them a popular choice for many types of construction and architectural projects. Whether you are looking for a unique material for a sculptural work of art or a strong foundation for an outdoor structure, limestone blocks are an excellent choice. With the help of S F Marble and Granite, you can find the perfect limestone blocks to suit your specific needs and bring your vision to life. FAQS What is limestone made of? Limestone is made primarily of calcium carbonate, which is formed from the accumulation of shells, coral, and other organic materials over millions of years. Is limestone a strong material for construction? Yes, limestone is a strong and durable material that has been used in construction and architectural applications for centuries. How is limestone cut into blocks? Limestone blocks are cut from large pieces of limestone rock using specialized cutting tools such as diamond saws. This process involves sawing the rock into the desired size and shape, which can be accomplished in a variety of ways depending on the type of project and the desired result. Can limestone be molded into different shapes? Yes, both natural and manufactured limestone blocks can be molded into different shapes. Manufactured limestone blocks are made from crushed limestone and molded into specific shapes, while cut limestone blocks can be shaped to meet specific project requirements. Is limestone a good choice for outdoor projects? Yes, limestone is a great choice for outdoor projects due to its durability, natural beauty, and ability to withstand the elements. It is commonly used for retaining walls, garden beds, and walkways, as well as for monuments and other large-scale outdoor structures.   Our Services Backsplashes Granite Repair Granite Fabrication Granite Installation Swimming Pool Tile Countertops Installation Marble Floor Installation Contact Us 755 Dutton St. Lowell-MA 01854 Phone: 978-459-5823 FAX: 978 459 5827 smgranite@hotmail.com Our Blogs How Do You Clean Quartz Countertops Like a Pro? Expert Tips Revealed How Do You Clean Quartz Countertops Like a Pro? Expert Tips Revealed How do you… Read More January 14, 2025 Top 10 Most Popular Granite Colors of 2024 Top 10 Most Popular Granite Colors of 2024 Granite Colors have long been celebrated for… Read More January 10, 2025 Top 12 Backsplash Ideas for White Cabinets and Granite Countertops Top 12 Backsplash Ideas for White

Limestone Blocks: A Guide to Understanding their Benefits and Uses Read More »

Scroll to Top