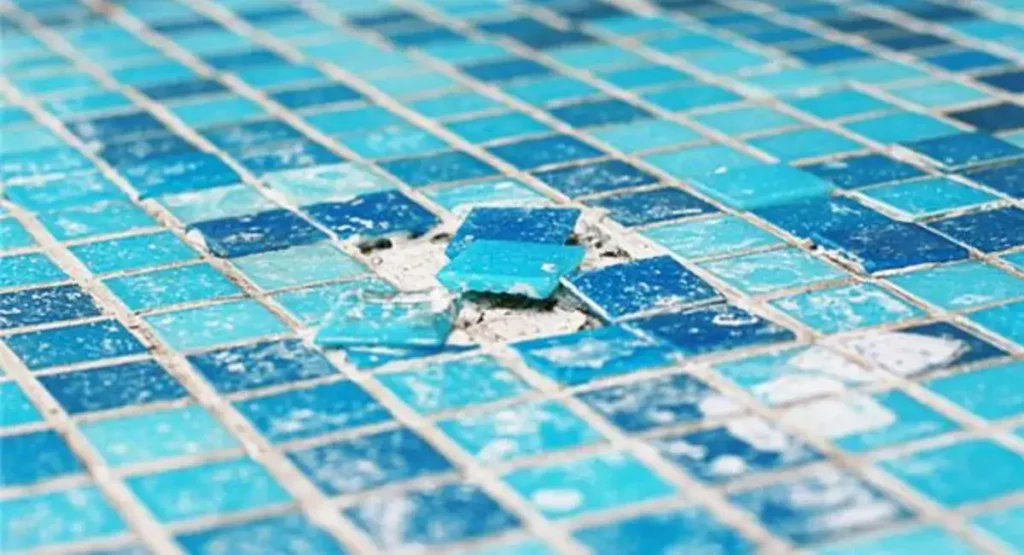
You have water loss from your pool and the grout lines surrounding the tile are chalky, fractured or missing in sections. This isn’t simply cosmetic. When the grout breaks, water gets under the tile, a small fissure becomes a loose tile, a greater leak, and a bigger price. We get it. We’ve solved this identical problem more times than we can count.
This article tells you: exactly how to figure out if your grout is the issue, the exact repair method pool experts use, what grout to purchase, and when it’s time to call a pro rather than DIY. No filler, no guess work. Swimming pool tile grout repair sounds scary unless you break it down into steps, and that’s what we’re doing here.
Understanding the Importance of Swimming Pool Tile Grout Repair
Grout isn’t decoration. It’s the seal that keeps water where it belongs and out of the concrete or gunite shell behind your tile. When that seal breaks down, water finds a way in, and it doesn’t stop until someone fixes it.
Left alone, a small crack lets water seep behind the tile line every time the pool is full. Over months, that moisture weakens the bond between tile and shell. Tiles pop loose. Calcium deposits build up along the waterline. What would’ve been a half-day repair turns into a full tile replacement job.
Pool grout also takes a beating that bathroom grout never sees. It’s underwater for months at a time, exposed to chlorine, pH swings, and UV at the waterline. Regular cement-based grout wasn’t built for that. This is why swimming pool tile grout repair almost always comes back to one material: epoxy grout, which we’ll get into shortly.
Is Water Loss Really a Grout Problem?
Not always. Grout sits behind roughly 8 to 10 inches of concrete, so it rarely causes major leaks on its own. Before repairing grout, rule out plumbing lines, skimmer cracks, and light fixture conduits, since these cause most sudden water loss.
Here’s a simple test. Turn off the pump and equipment, then mark the water level with tape. Wait 24 hours. If the level barely drops, your leak is likely evaporation, not structural. If it drops fast, plug the skimmer, returns, and cleaner line, then wait again. A leak that stops once the lines are plugged points to plumbing, not grout.
If the water still drops with everything plugged, grout and tile become the more likely suspects. A dye test confirms it. Pool supply stores sell leak detection dye in a syringe. With the pump off and the water still, release a small amount near suspect cracks or joints. If the dye gets pulled into a gap, you’ve found your leak.
Skimmer housings and light niches crack internally more often than grout lines do. It’s worth checking both before you drain the pool and start chipping out grout that was never the actual problem.
The Process of Pool Tile Repair Underwater
You don’t necessarily have to drain it all the way. Techs may also work in a semi-wet environment for modest patch jobs at or above the waterline, lowering the water a few inches below the damaged region.
First, remove any loose or crumbling grout using a grout saw or oscillating tool. Be careful not to chip the borders of the tile. Remove joint to a depth of at least 1/8 inch. If you apply any less the new grout won’t stick.
Rinse the joint and let it dry as much as conditions will allow. Epoxy grout can go fast once mixed thus mix in small amounts. Take the rubber float and pack it into the joint at an angle so it fills the gap and doesn’t just sit on top.
In 15 to 20 minutes, remove the surplus with a damp sponge, washing the sponge frequently in clean water. A faint haze often develops after a few of hours. Wipe off with a soft cloth and allow the repair to cure for at least 24 hours before returning the pool to normal water level.
Pool Coping Grout Repair: Restoring the Beauty of the Pool Edge
Coping is the cap that sits right where your pool deck meets the water, and its grout joints take a different kind of punishment. Sun, foot traffic, and pool chemicals hit this area hardest, so cracks here show up faster than anywhere else in the pool.
The repair steps mirror what’s used underwater: remove the failed grout, clean the joint, and pack it with fresh material. The difference is exposure. Coping grout deals with direct sun and freeze-thaw cycles in colder climates, so a flexible, waterproof epoxy grout matters even more here than below the waterline.
Cracked coping grout often signals a bigger issue too. If the coping stones themselves are shifting or lifting, grout alone won’t fix it. Check for movement in the coping stones before you regrout, since patching over a shifting foundation just means redoing the work in a year.
Epoxy Grout for Pool Tile: A Durable and Waterproof Solution
Standard cement grout works fine on a kitchen backsplash. It has no business in a swimming pool. Cement grout is porous, so it absorbs water, breaks down under constant chemical exposure, and typically needs replacing within a couple of years.
Epoxy grout is a different animal. It’s made from epoxy resins and a filler powder instead of cement, which makes it non-porous and resistant to chlorine, salt, and pH swings. It costs roughly three times more than standard grout upfront, but it commonly lasts 10 to 15 years in a properly maintained pool, which makes the math work out in its favor.
There’s also modified epoxy grout, a hybrid that’s easier to work with but usually needs a sealer every couple of years to keep its water resistance up. Pure epoxy grout skips that step entirely once it’s cured. If you’re deciding between the two, factor in how much upkeep you’re willing to do down the line, not just the price tag on the bag.
How Do You Repair Tile Grout in a Pool?
You repair pool tile grout by removing the damaged material to at least 1/8 inch deep, cleaning the joint thoroughly, and packing it with epoxy grout using a rubber float. After wiping the excess and removing haze, the grout needs 24 to 48 hours to cure before refilling.
The order of operations matters more than most DIYers expect. Skipping the cleaning step is the single most common reason repairs fail early, since new grout won’t bond to a joint with old debris still in it. Take the extra ten minutes to vacuum and wipe the area before you mix anything.
Temperature affects the outcome too. Epoxy grout sets faster in heat, so working in the early morning or late afternoon gives you more time to pack the material properly instead of racing against it in the midday sun.
What Do You Use to Regrout Pool Tile?
Regrouting pool tile requires epoxy grout, a rubber float for application, large sponges for cleanup, two 5-gallon buckets, and a grout removal tool. A pH-neutral cleaner is also needed to prep the tile surface before applying new grout.
Skip generic grout floats if you can, and get one with a firm rubber edge, since it packs material into the joint more evenly than a soft one. For removal, an oscillating multi-tool with a grout blade attachment cuts the job time down significantly compared to doing it by hand with a manual scraper.
Two buckets matter more than people realize. One holds clean rinse water for your sponge, and the other holds fresh water for final wiping. Swap the rinse bucket out once it clouds up, or you’ll just smear grout haze back onto the tile instead of removing it.
Do You Need Special Grout for Pool Tiles?
Yes. Pool tiles need epoxy grout, not standard cement-based grout. Cement grout is porous and breaks down quickly underwater, while epoxy grout resists chlorine, salt, and pH changes, holding up for over a decade in a properly maintained pool.
Joint width matters when picking a specific epoxy product too. Joints wider than 1/8 inch typically need a sanded epoxy formula, since non-sanded versions shrink and crack when applied too thick. Check the joint width with a ruler before you buy, so you’re not stuck returning half-used bags.
Color matters more than people expect too. Pool tile grout comes in a range of shades built to resist UV fading, since a joint that turns yellow or gray in a year sticks out against clean tile. Match the color to your existing grout, or pick a shade one tone lighter than the tile itself for a cleaner look.
Can Water Leak Through Pool Tile Grout?
“Pool tile grout leaking water is rare, but it happens. It’s not as common as plumbing or fixture leaks. Typically there is 8-10 inches of concrete behind the tile line thus a true grout leak only typically occurs with a noticeable crack in the tile itself.
That said, if left alone, a grout leak doesn’t stay little. Water seeping beneath tile eventually erodes the bond coat and tiles that formerly sat flush start to lift or snap off altogether. A seemingly small cosmetic issue in year one can lead to replacing a tile piece by year three.
That’s part of the reason swimming pool tile grout repair is best performed as a maintenance habit, rather than a one-time fix. Finding those hairline fractures early, before they ever become openings that you can see water running through, saves money, and a much larger project later on.
DIY Repair or Call a Professional?
Simple, small-scale grout touch-ups on stable ceramic tile are reasonable DIY territory if you’ve got a free weekend and basic tools. Complex tile patterns, glass or mosaic tile, and areas larger than 100 square feet push the job into a different category entirely.
Cost is usually the deciding factor for most homeowners. A basic DIY kit runs somewhere between $150 and $250, while a professional crew typically charges based on square footage and tile type, often landing between $500 and $2,000 for a standard residential pool depending on damage extent.
Beyond cost, there’s risk. A cracked tile during removal, an uneven epoxy mix, or missed loose tiles under the surface all turn a weekend project into a redo. If you’re seeing multiple loose tiles, water behind the tile line, or grout that’s original to a pool over 15 years old, it’s worth getting a quote before picking up a scraper.
Restore Your Pool’s Sparkle
Every pool owner knows that a fresh look starts with solid Swimming Pool Tile Grout Repair, and with the right steps, you can tackle pool grout repair, pool tile grout repair, or even a full pool grout replacement without stress. Start by cleaning the tiles to remove buildup, mix high-quality grout formulated for swimming pool tile grout repair, and carefully apply it into the joints using gentle pressure to seal every gap. Once cured, this helps prevent leaks and keeps algae at bay, making routine swimming pool grout repair a breeze. For chips or loose pieces, consider expert pool tile and grout repairs to ensure longevity. Ready for a seamless upgrade? Pair your repair with professional Swimming Pool Tile Installation in Lowell to give your pool edge a flawless finish. Contact us today!
Conclusion
Repairing swimming pool tile grout is a vital aspect of pool maintenance to preserve the beauty and functionality of your pool. Whether it’s underwater tile repair, pool coping grout repair, or the use of epoxy grout, taking the time to address grout issues will ensure a stunning collection you can enjoy for years. By following the techniques and tips outlined in this guide and relying on the expertise of professionals like SF Marble and Granite, you can achieve a successful pool tile grout repair and maintain a pool that is the envy of all. Regular inspections, prompt repairs, and consistent maintenance are key to a beautiful and long-lasting pool.
FAQs
How long does epoxy grout take to cure in a pool?
Epoxy grout typically needs 24 to 48 hours before the pool can be refilled to normal level. Full chemical curing can take up to two weeks, so it’s best to hold off on shocking the water during that window.
Can I regrout pool tile without draining the pool?
Small, above-waterline repairs can often be done by lowering the water a few inches rather than draining fully. Larger jobs covering multiple rows of tile usually require a deeper drain to work safely and get a clean bond.
How much does professional pool grout repair cost?
Costs vary by pool size, tile type, and damage extent, but residential jobs commonly range from $500 to $2,000. Pools with extensive damage, glass tile, or mosaic patterns tend to land at the higher end.
Can you put new grout over old grout?
No. New grout won’t bond properly to old material, and it typically cracks and falls out within months. The old grout needs to come out to a depth of at least 1/8 inch before applying anything new.
How often should pool grout be resealed?
Modified epoxy grout generally needs resealing every two years. Pure epoxy grout doesn’t require sealing once it’s fully cured, which is one reason it costs more upfront but less to maintain over time.
Have questions about your specific pool or want an in-person look at the damage? Contact us and we’ll walk you through what the repair actually needs before you spend a dime on materials.