S F Marble & Granite

Marble and Granite

White Carrara Marble Bathroom Ideas

Exploring White Carrara Marble Bathroom Ideas: Elevate Your Space with SF Marble And Granite Inc.

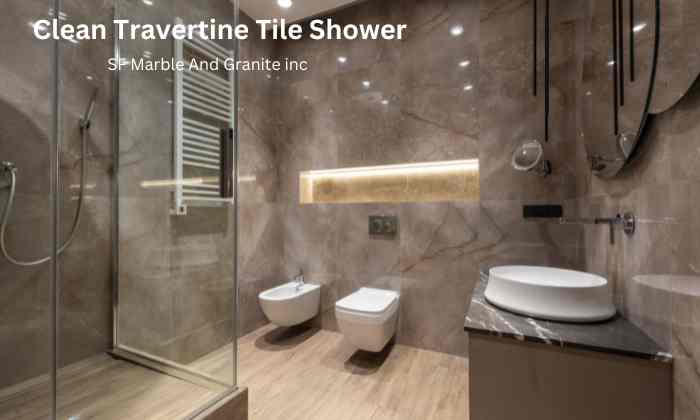
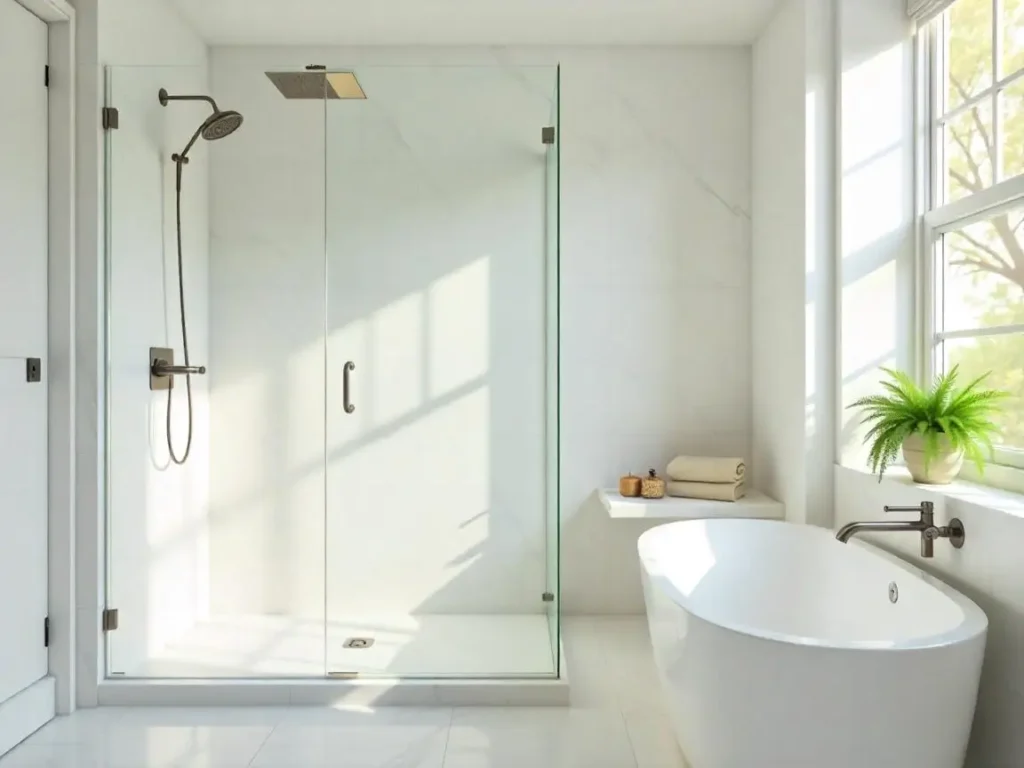
Exploring White Carrara Marble Bathroom Ideas Home Have you ever stepped into a space that instantly felt like a personal retreat? Our blog, featuring White Carrara Marble Bathroom Ideas, invites you to reimagine your bathroom with a harmonious blend of timeless luxury and contemporary comfort. The pristine white backdrop and subtle, artful gray veining create a serene canvas, perfectly setting the stage for elegant vanities and captivating shower walls. At SF Marble And Granite Inc., we combine passion and craftsmanship to help you transform your space into a warm, welcoming sanctuary that reflects both style and personality. The Elegance of White Carrara Marble​ White Carrara Marble is renowned worldwide for its timeless elegance and natural beauty. Quarried from the majestic mountains of Carrara, Italy, this exquisite stone has been a symbol of luxury and sophistication for centuries. Pristine White Aesthetic One of the defining characteristics of marble is its pristine white background. This pure, milky hue provides a canvas of unparalleled elegance, making it a top choice for designers and homeowners alike. Delicate Gray Veining What truly sets White Carrara Marble apart is the intricate gray veining that meanders through its surface. These veins, resembling delicate brushstrokes on a canvas, add a touch of artistry and depth to the marble’s appearance. No two slabs are identical, ensuring that your space is uniquely adorned. Timelessness and Endurance White Carrara Marble possesses a timeless quality that transcends trends and fads. Whether used in classical or contemporary settings, it retains its beauty, making it an enduring choice. Its ability to stand the test of time is a testament to both its physical durability and aesthetic appeal. Versatility in Design Designers and architects adore White Carrara Marble for its versatility. From bathroom countertops to kitchen islands, flooring, and wall cladding, it seamlessly integrates into various design styles. Whether you’re aiming for a minimalist, rustic, or opulent look, White Carrara Marble can adapt and enhance the overall aesthetics. A Touch of Luxury Incorporating White Carrara Marble into your living spaces elevates them to the realm of luxury. Whether used in a bathroom, kitchen, or even as a statement piece in your living room, it exudes opulence and refinement. Honoring Tradition Throughout history, White Carrara Marble has been used in iconic works of art and architecture, including Michelangelo’s “David” and the Pantheon’s grand columns in Rome. By choosing White Carrara Marble, you connect your space to this rich heritage, creating a sense of timelessness and sophistication. Why Choose White Carrara Marble for Your Bathroom? White Carrara Marble is a premier choice for bathroom design, and for several compelling reasons: Unparalleled Elegance and Timelessness White Carrara Marble embodies luxury and timelessness like no other. Its classic, pristine white surface with delicate gray veining creates an air of sophistication that transcends design trends. By choosing White Carrara Marble, you ensure that your bathroom remains visually captivating for years to come. Durability and Longevity A bathroom is a high-traffic area, and the materials you choose must withstand daily use. White Carrara Marble excels in durability and longevity. It is a robust stone that can handle the demands of a busy bathroom without losing its luster. With proper care, your White Carrara Marble bathroom will stay looking beautiful for generations. Versatile Design Options Designing with White Carrara Marble offers endless possibilities. Whether you prefer a traditional, contemporary, or eclectic bathroom style, this marble seamlessly integrates into various design aesthetics. You can use it for countertops, flooring, shower walls, or even as an accent piece. Its versatility allows you to express your unique taste and vision. Spa-Like Atmosphere Transform your bathroom into a luxurious spa-like retreat with White Carrara Marble. Its luminous surface and soothing color palette create a serene ambiance. Stepping into a bathroom adorned with White Carrara Marble is like entering a haven of relaxation and tranquility. Value Addition to Your Home Investing in White Carrara Marble for your bathroom not only enhances your daily living experience but also adds significant value to your home. Should you decide to sell in the future, a bathroom with White Carrara Marble can be a strong selling point, attracting potential buyers with its timeless appeal. Designing with White Carrara Marble White Carrara Marble offers a world of design opportunities, allowing you to transform your bathroom into a haven of elegance and sophistication. These are some important factors to think about:: Creating a Luxurious White Carrara Marble Bathroom A luxurious bathroom begins with the selection of the right materials, and White Carrara Marble is the epitome of luxury. Here’s how you can create a lavish White Carrara Marble bathroom: Flooring: Start by adorning your bathroom floor with large-format White Carrara Marble tiles. The smooth, cool surface underfoot provides a spa-like experience. Shower Walls: Extend the elegance into your shower area by using White Carrara Marble slabs or tiles on the walls. This creates a seamless and visually striking look. Freestanding Bathtub: Place a freestanding bathtub in the center of the bathroom. Its sculptural form contrasts beautifully with the marble surroundings. Fixtures: Choose fixtures in polished chrome or brushed nickel to complement the marble’s natural beauty. Lighting: Install soft, warm lighting fixtures that accentuate the marble’s veining and create a cozy atmosphere. Incorporating White Carrara Marble Tiles White Carrara Marble tiles are a versatile choice for adding a touch of luxury to your bathroom. Here are a few inventive ways to use them: Accent Wall: Designate one wall as an accent wall and cover it with White Carrara Marble tiles. This draws the eye and adds drama to the space. Shower Niche: Create a shower niche using White Carrara Marble tiles. It not only serves a practical purpose but also adds an element of style to your shower. Floor-to-Ceiling Elegance: Extend the use of White Carrara Marble tiles from the floor to the ceiling in your shower area for a cohesive and visually impactful design. White Carrara Marble Countertops: A Touch of Opulence Countertops are a focal point in any bathroom, and White

Exploring White Carrara Marble Bathroom Ideas: Elevate Your Space with SF Marble And Granite Inc. Read More »

How to Clean Travertine Tile Shower

How to Clean Travertine Tile Shower: Mastering the Art of Bathroom Elegance

How to Clean Travertine Tile Shower: Mastering the Art of Bathroom Elegance Home When it comes to maintaining the beauty of your bathroom’s travertine shower, SF Marble And Granite Inc stands as your trusted partner. Their specialized range of products is tailored to enhance and preserve your travertine’s natural elegance. By integrating SF Marble And Granite Inc into your routine, you’ll discover the secret to a pristine travertine tile shower. Travertine tile showers add a touch of luxury to any bathroom, but to keep them looking their best, regular maintenance and professional travertine tile cleaning are essential. In this guide, we’ll walk you through the process of travertine tile cleaning and maintaining your shower. From choosing the right cleaning products to removing stubborn stains, we’ve got you covered. Understanding Travertine Tile Travertine is a type of natural stone known for its distinctive patterns and earthy colors. When used in showers, it can create a stunning and timeless appearance. However, it’s important to understand that travertine is porous, which means it has tiny holes and spaces within the stone. The porosity of travertine is both a unique feature and a potential challenge. While it gives the stone its character, it also makes travertine more susceptible to staining and damage compared to non-porous materials. To maintain the beauty and longevity of your travertine tile shower, it’s crucial to know how to clean and care for it properly. This includes regular cleaning routines, the use of appropriate cleaning products, and taking precautions to prevent stains and moisture-related issues. Preparation Before you begin the process of cleaning and maintaining your travertine tile shower, it’s essential to make proper preparations. This ensures that you have everything you need and that you protect the surrounding areas from potential damage. Gather Your Cleaning Supplies Get the following cleaners before you begin: Soft-Bristle Brush: You’ll need a soft-bristle brush to gently scrub the travertine tiles without scratching or causing any damage. pH-Neutral Cleaner: Choose a pH-neutral cleaner specifically designed for natural stone surfaces. Avoid acidic or abrasive cleaners, as they can harm travertine. Distilled Water: Using distilled water is preferable to tap water, as it doesn’t contain minerals that can leave residue on your tiles. Microfiber Cloth: A microfiber cloth is excellent for wiping and drying the surfaces after cleaning. It’s soft and won’t scratch the tiles. Protecting the Surrounding Areas While cleaning your travertine tile shower, take precautions to protect any adjacent or surrounding surfaces: Cover Faucets and Fixtures: Use plastic bags or towels to cover faucets, showerheads, and any metal fixtures to prevent accidental splashes of cleaning solution. Tape Off Grout Lines: Delicate grout lines can be sensitive to cleaning agents. You can use painter’s tape to cover the grout lines if you’re concerned about the cleaner affecting them. Regular Cleaning To ensure that your travertine tile shower retains its pristine appearance, it’s essential to establish a regular cleaning routine. Regular maintenance not only keeps your shower looking beautiful but also prevents the buildup of grime and stains. Below, we outline the steps for both daily and weekly cleaning to help you maintain your travertine shower effectively. Daily Maintenance Wipe Down Surfaces: After each shower, use a soft, damp cloth or a squeegee to wipe down the travertine tile surfaces. This removes soap scum, water spots, and excess moisture. Pay special attention to the areas where water accumulates, such as the corners and lower tiles. Dry Thoroughly: Ensure that the shower enclosure is well-ventilated to allow for quick drying. Use a microfiber cloth to dry any remaining moisture, especially on the tiles and glass doors. Mineral buildup and water stains are reduced as a result. Weekly Cleaning Routine In addition to daily maintenance, it’s essential to perform a more thorough cleaning of your travertine tile shower once a week. Follow these steps: Prepare Your Cleaning Solution: Mix a small amount of pH-neutral cleaner with distilled water. Avoid using abrasive or acidic cleaners, as they can damage the travertine surface. Apply the Cleaning Solution: Using a soft-bristle brush or a sponge, apply the cleaning solution to the tiles. Start from the top and work your way down to prevent streaks and drips. Gently Scrub: With a gentle touch, scrub the tiles, focusing on areas with soap scum or visible dirt. Avoid using excessive pressure, as travertine is a delicate stone. Rinse Thoroughly: Use clean, distilled water to rinse away the cleaning solution. Ensure there are no residues left on the tiles. Dry the Surfaces: Once you’ve rinsed thoroughly, use a microfiber cloth to dry the shower surfaces. This step prevents water spots and leaves your tiles gleaming. Cleaning Products for Travertine Tiles: Natural vs. Chemical Cleaners Choosing the right cleaning products is a crucial step in maintaining your travertine tile shower’s beauty and longevity. When it comes to cleaning solutions, you’ll encounter two main categories: natural cleaners and chemical cleaners. Let’s explore the differences and considerations for each. Natural Cleaners Advantages of Natural Cleaners: Gentle on Stone: Natural cleaners are typically milder and gentler on travertine tiles. They won’t strip away the stone’s natural finish or cause etching. Environmentally Friendly: Many natural cleaners are eco-friendly and biodegradable, making them a responsible choice for the environment. Non-Toxic: They are often non-toxic and safe for household use, reducing health risks for you and your family. Examples of Natural Cleaners: Vinegar and Water: A mixture of white vinegar and distilled water is an effective natural cleaner for travertine tiles. It helps remove mineral deposits and soap scum. Castile Soap: Diluted castile soap can be used to clean travertine surfaces gently. It’s free from harsh chemicals. Chemical Cleaners Advantages of Chemical Cleaners: Effective Against Tough Stains: Chemical cleaners may be more effective at removing stubborn stains, such as mold or mildew. Convenience: Some chemical cleaners come in spray bottles, making them convenient for quick clean-ups. Considerations for Chemical Cleaners: Acidity: Chemical cleaners can be acidic, and some may contain harsh chemicals that can damage travertine tiles if not used carefully.

How to Clean Travertine Tile Shower: Mastering the Art of Bathroom Elegance Read More »

Travertine Floor Cleaning

Travertine Floor Cleaning: A Comprehensive Guide by SF Marble And Granite Inc.

Travertine Floor Cleaning: A Comprehensive Guide by SF Marble And Granite Inc. Travertine Floor Cleaning is not just a chore; it’s a key aspect of preserving the timeless beauty and durability of your stone surfaces. Whether you have travertine floors in your home or commercial space, proper cleaning is essential to keep them looking pristine and well-maintained. In this guide, we will explore the ins and outs of travertine floor cleaning, sharing valuable insights to help you achieve immaculate surfaces that exude elegance. Travertine floors are a beautiful addition to any home or space, but they require proper care to maintain their elegance. In this article, we will guide you through the essential steps of travertine floor cleaning, ensuring your floors remain a testament to luxury and sophistication. If you’re looking to restore the natural beauty of your travertine floors, look no further than SF Marble And Granite Inc. Our expertise in Travertine Floor Cleaning ensures that your floors regain their pristine appearance, making your space shine with elegance and sophistication. How Often to Clean Your Travertine Floors Cleaning travertine floors is essential to maintain their beauty and longevity. The frequency of cleaning depends on various factors, including the level of foot traffic and the potential for spills and stains. Here’s a guide on how often to clean your travertine floors: Daily Maintenance: Sweep or dust mop your travertine floors daily. This helps remove loose dirt, dust, and debris that can scratch the surface over time. Use a soft-bristle broom or a microfiber dust mop for this task. Consider placing doormats at entry points to minimize the amount of dirt brought indoors. Regular Wiping: For routine cleaning, you should wipe down your travertine floors at least once a week or as needed. Utilize a mild dish soap diluted in warm water or a stone cleaner with a pH neutral formula. Dampen a soft cloth or mop with the cleaning solution, ensuring it’s not excessively wet. Wipe the floor in a circular motion, paying extra attention to high-traffic areas and spots where spills may occur. Monthly Deep Cleaning: Once a month, perform a more thorough cleaning of your travertine floors. Use a specialized stone cleaner designed for travertine surfaces. As directed by the manufacturer, dilute the cleanser. Mop the floor with the diluted cleaner, ensuring it doesn’t leave streaks or residue. Focus on grout lines and any stains or spills during this deep cleaning. Spill Cleanup: To avoid stains, spills should be cleaned up right away. Blot the spilled liquid with a soft, absorbent cloth or paper towel. Avoid wiping, as this can spread the spill. Instead, press down gently to absorb it. Clean the area with a damp cloth and a bit of stone cleaner. Avoid Harsh Chemicals: Never use acidic or abrasive cleaners on travertine floors, as they can damage the stone. Avoid vinegar, ammonia, and bleach-based products. Regular Sealing: To protect your travertine floors from stains and moisture, it’s essential to have them sealed. The frequency of sealing depends on factors like foot traffic and the quality of the sealer used. Generally, resealing is needed every 1-2 years. By following these cleaning guidelines, you can ensure that your travertine floors remain in excellent condition and continue to enhance the beauty of your space. Regular maintenance will extend their lifespan and keep them looking their best for years to come. Step-by-Step Cleaning Instructions Cleaning your travertine floors properly involves a systematic approach. Follow these step-by-step cleaning instructions to ensure your floors remain pristine: Step 1: Gather Your Cleaning Supplies Before you begin, gather the necessary cleaning supplies: A soft mop or a microfiber cloth A pH-neutral or stone-safe cleaner specifically designed for travertine Warm water A bucket A soft-bristle brush (for grout cleaning) Towels for drying Step 2: Sweep and dust First, sweep and dust the entire floor. This initial step removes loose dirt, dust, and debris that could scratch the surface when mopping. Step 3: Mix Your Cleaning Solution Follow the manufacturer’s instructions to prepare your cleaning solution. Generally, you’ll dilute the stone cleaner in warm water. Ensure the solution is properly mixed before use. Step 4: Dampen Your Mop or Cloth Dip your mop or microfiber cloth into the cleaning solution and wring it out thoroughly. The mop or cloth needs to be moist but not drenched. Step 5: Mop the Floor Mop the travertine floor, working in manageable sections. Start at one of the room’s corners and work your way out. This way, you won’t walk on the freshly cleaned areas. Step 6: Gentle Scrub for Grout Lines For grout lines or any stubborn stains, use a soft-bristle brush. Gently scrub the grout lines or stained areas. Avoid using abrasive tools that could harm the travertine. Step 7: Rinse and Dry After mopping, rinse the floor by wiping it down with clean, warm water. This step is crucial to removing any remaining cleaning solution, which can leave streaks or residue if not properly rinsed. Step 8: Dry the Floor Thoroughly dry the travertine floor using clean, dry towels. This prevents any water spots or streaks from forming as the floor dries naturally. Step 9: Inspect and Touch Up Inspect the floor for any missed spots or streaks. If necessary, touch up those areas using the damp cloth or mop with clean water. Remember that travertine is a porous stone, so it’s essential to use a pH-neutral or stone-safe cleaner to avoid damaging it. Harsh chemicals, such as bleach or vinegar, should be avoided at all costs. Additionally, never allow spills to sit on the floor for extended periods, as they can penetrate and stain the stone. Pro Tips for Sealing Travertine Floors Sealing your travertine floors is a critical step in their maintenance, as it helps protect them from stains and moisture penetration. Here are some pro tips for effectively sealing your travertine floors: Choose a High-Quality Stone Sealer: Opt for a premium-quality stone sealer specifically designed for travertine surfaces. Not all sealers are created

Travertine Floor Cleaning: A Comprehensive Guide by SF Marble And Granite Inc. Read More »

travertine-floor-restoration

Travertine Floor Restoration: Revive Your Space’s Elegance

Travertine Floor Restoration: Revive Your Space’s Elegance Travertine floors bring a touch of timeless elegance to any space, but over time, wear and tear can dim their natural beauty. If you’re looking to restore the luster of your travertine floors, look no further. SF Marble And Granite Inc is here to provide travertine floor restoration services that will breathe new life into your living spaces. Travertine Floor Restoration by SF Marble And Granite Inc. offers a transformative experience for your living spaces. With a commitment to excellence and years of expertise, SF Marble And Granite Inc. brings your travertine floors back to life, unveiling their original elegance. As a leader in the industry, SF Marble And Granite Inc. is synonymous with precision, artistry, and exceptional results. Our team’s passion for perfection ensures that every scratch, stain, and imperfection is meticulously addressed, leaving you with floors that exude timeless beauty. Discover the unmatched expertise of SF Marble And Granite Inc. and let us redefine your space through the art of travertine floor restoration. Understanding Travertine Floors Travertine is a captivating natural stone that has become a popular choice for flooring due to its remarkable texture and impressive durability. However, as time goes by, daily wear and tear can take a toll on its appearance, resulting in scratches, a loss of shine, and even discoloration. This is where the significance of travertine floor restoration comes into play. Travertine is a type of limestone that forms around mineral springs, often resulting in a distinct and charming porous texture. This unique texture is a significant part of its appeal, lending an air of sophistication to any space it adorns. With its diverse range of earthy hues, from creamy beige to warm gold, travertine offers a natural elegance that complements various interior styles. As you walk across travertine floors, you might notice subtle variations in texture and color, which add to its character. However, over time, these variations can become more pronounced due to wear and exposure. Foot traffic, dirt, and even cleaning products can impact the stone’s surface, leading to a gradual loss of its original sheen. To truly appreciate the beauty of travertine, it’s important to understand its characteristics and how they evolve over time. Regular maintenance can help delay the effects of aging, but even with the best care, restoration becomes necessary at some point to bring back the stone’s innate elegance. The process of restoring travertine floors involves a combination of cleaning, repair, honing, polishing, and sealing. These steps work together to reverse the effects of wear, revealing the stone’s natural beauty once again. By addressing scratches, stains, and uneven surfaces, restoration not only enhances the aesthetics but also prolongs the life of your travertine floors. In the next section, we’ll delve deeper into the signs that indicate your travertine floors are in need of restoration. Understanding these signs will help you make informed decisions about maintaining the charm and allure of your living spaces. More merely restoring travertine floors, SF Marble And Granite Inc. offers an array of premium services that elevate your home’s aesthetics. Our expertise extends to granite fabrication, where we craft exquisite countertops and surfaces that redefine elegance. Whether it’s a stunning kitchen island or a luxurious bathroom vanity, our artisans bring granite to life with impeccable craftsmanship.” Signs Your Travertine Floors Need Restoration Travertine floors, known for their timeless elegance, can lose their luster over time due to regular use and exposure. Recognizing the signs that your floors require restoration is essential to preserve their natural beauty and extend their lifespan. Here are some indicators that it might be time to consider restoring your travertine floors: Faded Luster: If your once-brilliant floors have lost their shine and appear lackluster, it’s a clear sign that the stone’s surface needs attention. Restoration can bring back their original vibrancy. Scratches and Scuffs: Over time, foot traffic, furniture movement, and even the presence of pets can lead to scratches and scuffs on the surface of your travertine floors. These imperfections can not only affect the aesthetics but also create an uneven texture. Stains and Discoloration: Spills, especially those containing acidic substances, can leave behind stubborn stains and cause discoloration. If your travertine floors have lost their uniform appearance due to staining, restoration can help remove these blemishes. Uneven Tiles: If some tiles have sunk lower or raised higher than the surrounding ones, it not only detracts from the visual appeal but can also pose a tripping hazard. Restoration involves leveling the tiles to create a smooth and safe surface. Cracks: Cracks in the travertine can develop due to various factors, including settling of the foundation or heavy impacts. These cracks not only disrupt the elegance of the floor but also provide entry points for dirt and moisture, potentially causing further damage. Dull Grout: The grout lines between the tiles can accumulate dirt and lose their original color over time. Restoring your travertine floors often includes cleaning and resealing the grout to bring back a fresh and clean appearance. Lack of Sealer Effectiveness: Sealing is crucial for maintaining the integrity of travertine. If water or spills are no longer beading on the surface but are instead getting absorbed, it indicates that the protective sealer has worn off and restoration is needed. Recognizing these signs early and addressing them promptly through restoration can not only revitalize the appearance of your travertine floors but also prevent further damage. Next, we’ll delve into the comprehensive restoration process that can breathe new life into your beloved floors. Moreover, our team specializes in flawless granite installation, ensuring that every piece is seamlessly integrated into your space. From sleek and modern designs to classic and timeless aesthetics, our installation expertise guarantees a perfect fit that transforms your interiors. The Restoration Process Restoring your travertine floors is a meticulous process that involves several steps to bring back their original beauty and sheen. Whether your floors have suffered from scratches, stains, or a general loss of luster, the

Travertine Floor Restoration: Revive Your Space’s Elegance Read More »

How to Tile a Fireplace

How to Tile a Fireplace: A Comprehensive Guide by SF Marble And Granite Inc

How to Tile a Fireplace: A Comprehensive Guide by SF Marble And Granite Inc How to Tile a Fireplace Transforming your fireplace with tiles can add a touch of elegance and warmth to your living space. To begin this creative project, gather all necessary materials including tiles, adhesive, spacers, a tile cutter, and a trowel. Start by cleaning the surface of the fireplace to ensure proper adhesion of the tiles. Apply a layer of adhesive using the trowel, making sure to create an even surface. Place the tiles with spacers in between to maintain a uniform gap. Are you looking to add a touch of elegance and style to your living space? Tiling your fireplace can transform the entire room, giving it a chic and sophisticated look. In this guide, brought to you by SF Marble And Granite Inc, we’ll walk you through the step-by-step process of tiling a fireplace to achieve stunning results. Whether you’re a seasoned DIY enthusiast or a novice looking to explore your creative side, this article will provide you with the knowledge and inspiration you need. Let’s dive in! Choosing the Right Tiles Selecting the perfect tiles sets the tone for your fireplace’s overall aesthetic. Opt for tiles that complement your interior design while also being able to withstand the heat generated by the fireplace. The right tiles not only enhance the visual appeal of your fireplace but also ensure its durability and longevity. When choosing tiles, consider the following factors: Material: Opt for heat-resistant materials like ceramic, porcelain, or natural stone. These materials can handle the high temperatures produced by the fireplace without cracking or warping. Style: Choose tiles that align with the style of your room. Whether you prefer a classic look, a modern vibe, or something in between, there are tiles available in various colors, patterns, and textures. Size: The size of the tiles can impact the overall appearance of your fireplace. Larger tiles can create a seamless and contemporary look, while smaller tiles can add intricate detail and charm. Color: The color of the tiles should complement the room’s color palette. Consider how the tiles will interact with the surrounding walls, furniture, and décor elements. Texture: The texture of the tiles can add visual interest to the fireplace. Textured tiles can create depth and dimension, making the fireplace a focal point in the room. Maintenance: Pick tiles that are simple to keep clean. Fireplaces can produce soot and ash, so tiles that can be wiped clean effortlessly are ideal. Before making a final decision, it’s a good idea to request samples and visualize how the tiles will look in your space. Take into account both the aesthetics and the practical aspects to ensure that the tiles you choose not only enhance your fireplace but also contribute to the overall atmosphere of the room. Alongside our expert fireplace tiling advice, SF Marble And Granite Inc also offers a range of additional services, including marble and floor installation. Elevate your home’s aesthetics with our comprehensive solutions.   Gathering the Necessary Tools Before you embark on tiling your fireplace, it’s crucial to gather all the essential tools you’ll need. The procedure will go more smoothly and effectively if the proper tools are available.  Here’s a list of tools you should gather before you start: Tile Cutter: A tile cutter is essential for accurately cutting tiles to fit around the edges of the fireplace and any other obstacles. Trowel: A notched trowel is used to apply adhesive evenly to the fireplace surface before placing the tiles. Spacers: Spacers maintain consistent gaps between tiles, ensuring a professional and even look. Level: A level helps you ensure that your tiles are straight and aligned correctly. Safety Gear: Safety should always be a priority. Wear safety goggles, gloves, and a dust mask to protect yourself from tile fragments and dust. Measuring Tape: Accurate measurements are essential to ensure that your tiles fit perfectly. Grout Float: This tool is used to apply grout to the spaces between tiles. Sponge: A damp sponge is necessary for cleaning excess grout from the tiles during the grouting process. Bucket and Mixing Paddle: You’ll need these to mix the adhesive and grout to the right consistency. Tile Nippers: Tile nippers help you make small, precise cuts on tiles when needed. Caulk Gun: A caulk gun is necessary for applying adhesive or caulk around the edges of the tiles. Painter’s Tape: Painter’s tape can be used to protect surfaces adjacent to the fireplace from adhesive and grout. Cleaning Supplies: Keep a bucket of water and rags on hand for cleaning up as you go. Dustpan and Broom: These will help you keep your workspace clean from debris. Primer (if needed): Depending on the condition of the fireplace surface, you may need to apply a primer before tiling. By having all these tools ready, you’ll be well-prepared to tackle the tiling process with confidence and efficiency. Make sure to set up your workspace in a well-ventilated area and follow safety precautions throughout the project. With the right tools and careful planning, you’ll be on your way to creating a beautifully tiled fireplace that enhances the aesthetics of your living space. Preparing the Fireplace Surface Before you begin the tiling process, it’s crucial to prepare the surface of your fireplace to ensure that the tiles adhere properly and the end result is both visually appealing and durable .To prepare the fireplace surface, take the following actions: Clean the Surface: Start by cleaning the fireplace surface thoroughly. Remove any dust, dirt, or debris using a brush or vacuum cleaner. Clean off any soot, grease, or residue that might hinder the adhesive’s effectiveness. Check for Damage: Inspect the fireplace surface for any cracks, chips, or unevenness. If you notice any significant damage, consider repairing it before tiling. Use a suitable filler or patching compound to address minor imperfections. Sand the Surface: If the surface is smooth and non-porous, use sandpaper to lightly roughen it. This makes the

How to Tile a Fireplace: A Comprehensive Guide by SF Marble And Granite Inc Read More »

Pool Travertine Pavers

Dive into Luxury: Elevate Your Pool with Travertine Pavers

Dive into Luxury: Elevate Your Pool with Travertine Pavers Welcome to our comprehensive guide on pool travertine pavers, presented by SF Marble And Granite Inc. If you’re looking to elevate the charm, durability, and functionality of your outdoor pool area, you’re in the right place. In this guide, we’ll delve into the world of pool travertine pavers, exploring their benefits, installation process, maintenance tips, and much more. Whether you’re a homeowner or a designer, these pavers have something unique to offer. Join us as we uncover the beauty and versatility that pool travertine pavers bring to your outdoor oasis. Dive in and discover how SF Marble And Granite Inc can help you transform your pool area into a stunning haven of luxury and style. Benefits of Pool Travertine Pavers When it comes to enhancing the aesthetics and functionality of your pool area, pool travertine pavers stand out as a remarkable choice. These natural stone pavers offer a range of benefits that make them a popular option among homeowners and designers alike. Let’s explore the numerous advantages that pool travertine pavers bring to your outdoor space. Durability and Longevity Travertine is renowned for its exceptional durability. It can withstand heavy foot traffic, pool chemicals, and the elements without losing its integrity. This longevity ensures that your investment in pool travertine pavers will stand the test of time. Heat Resistance Under the scorching sun, ordinary materials can become uncomfortably hot to walk on. Travertine, however, remains cool underfoot due to its natural heat-resistant properties. This makes it a comfortable and safe choice for your poolside lounging. Slip Resistance Safety is paramount in any pool area. Travertine pavers boast a naturally textured surface that provides excellent slip resistance even when wet. This helps prevent accidents and ensures a worry-free poolside experience. Aesthetic Elegance The timeless beauty of travertine adds a touch of elegance and sophistication to your outdoor space. With its diverse range of colors and patterns, you can choose the perfect style that complements your existing landscape and architectural elements. Customization Options Every pool area is unique, and travertine pavers offer versatility in design. Whether you prefer a classic layout or a more intricate pattern, these pavers can be cut and arranged to suit your specific aesthetic preferences. Investing in pool travertine pavers from SF Marble And Granite Inc means investing in a harmonious blend of durability, safety, and visual appeal. Elevate your pool area with these pavers and create a space that is not only functional but also a stunning visual masterpiece. Choosing the Perfect Pool Travertine Pavers Selecting the right pool travertine pavers for your outdoor oasis requires thoughtful consideration and a keen eye for detail. SF Marble And Granite Inc offers a wide range of options, each with its own unique characteristics. Let’s explore the essential factors to consider when choosing the perfect pool travertine pavers that align with your vision and needs: Before diving into the selection process, assess your pool area’s specific requirements. Consider factors such as the size of the space, the amount of foot traffic it receives, and the overall design theme you’re aiming for. Travertine pavers come in an array of natural colors, ranging from warm beige and earthy tones to cooler grays and whites. Additionally, they feature distinct veining patterns that add character and uniqueness. Choose a color and pattern that harmonizes with your landscape and complements the pool’s surroundings. Travertine pavers offer flexibility in size and shape, allowing you to create a layout that suits your preferences. Larger pavers can create a more open and spacious feel, while smaller ones lend themselves to intricate designs and detailing. SF Marble And Granite Inc offers a variety of travertine pavers at different price points. Establish a budget beforehand and explore the options that align with your financial considerations. Keep in mind that investing in quality pavers can lead to long-term cost savings through durability and reduced maintenance. As you embark on the journey of selecting your pool travertine pavers, remember that each option has its own distinct charm. By considering your pool area’s unique needs, visual preferences, and budget, you can make an informed choice that transforms your outdoor space into a stunning oasis of luxury and style. At SF Marble And Granite Inc, we’re here to assist you every step of the way. Installation Process Installing pool travertine pavers is a meticulous process that requires careful planning and execution to ensure a durable and visually appealing result. SF Marble And Granite Inc is committed to delivering a seamless installation experience. Let’s walk through the key steps involved in installing pool travertine pavers: Before laying the pavers, the pool area must be prepared. This involves clearing the area of debris, ensuring proper drainage, and creating a level surface. Proper site preparation is crucial to the longevity and stability of the paver installation. A stable and well-constructed base is essential for the pavers’ durability. Typically, a compacted aggregate base is created to provide a solid foundation. This base layer promotes proper water drainage and prevents shifting or settling of the pavers over time. Travertine pavers can be laid using various techniques, such as the traditional sand-set method or the more advanced mortar-set method. Each technique has its own advantages, and our experts will guide you to select the most suitable method for your project. After the pavers are laid, the gaps between them are filled with grout. This not only enhances the pavers’ stability but also prevents weed growth. Once the grout has cured, the pavers are sealed. Sealing helps protect the travertine from stains, moisture, and harsh pool chemicals, ensuring its longevity and beauty. With the pavers in place, the installation process is finalized by checking for proper alignment and ensuring that the surface is level. Any necessary adjustments are made, and the surrounding landscape is cleaned to reveal the transformed pool area. At SF Marble And Granite Inc, our experienced professionals are dedicated to executing a flawless installation that exceeds your expectations.

Dive into Luxury: Elevate Your Pool with Travertine Pavers Read More »

Travertine slabs

A Comprehensive Guide to Travertine Slabs by SF Marble And Granite Inc

A Comprehensive Guide to Travertine Slabs by SF Marble And Granite Inc Welcome to the world of timeless elegance and natural beauty – the realm of travertine slabs. When it comes to interior design and home transformation, few materials can rival the stunning allure and versatility that travertine brings to the table. In this comprehensive guide, brought to you by SF Marble And Granite Inc, we will embark on a journey to explore the captivating world of travertine slabs and how they can breathe new life into your living spaces. Whether you’re envisioning a luxurious kitchen, an inviting bathroom, or a statement-making accent wall, travertine slabs offer a canvas of possibilities that transcend trends and stand the test of time. Join us as we delve into the myriad benefits, creative applications, and expert insights that will help you make informed choices for your interior design endeavors. Unlock the secrets of durability, unveil the aesthetic charm, and unveil the potential to transform your home – all with the enduring elegance of travertine slabs. As we guide you through the intricacies of selection, installation, and maintenance, we invite you to envision a home that radiates sophistication and showcases your unique style. Let’s embark on this journey of discovery, where every slab is a work of art waiting to adorn your living spaces. Benefits of Travertine Slabs Travertine slabs stand as a testament to nature’s remarkable craftsmanship, offering a trifecta of advantages that make them an exceptional choice for your interior design aspirations. Let’s delve into these benefits: Durability and Longevity When investing in home improvements, longevity matters. Travertine slabs, born from the heart of the Earth, boast a remarkable ability to withstand the tests of time. Their innate durability ensures that your surfaces remain resilient, even in high-traffic areas. This means your floors, countertops, and walls will retain their impeccable charm for years to come, making travertine a truly wise and enduring investment. Aesthetic Appeal Elegance finds its true expression in the aesthetic allure of travertine slabs. Each slab is a masterpiece of nature, bearing unique patterns, shades, and textures that infuse your space with unmatched beauty. Whether you’re drawn to the earthy, rustic charm or the refined, contemporary elegance, travertine slabs offer a visual feast that resonates with diverse design sensibilities. Your interior design dreams come to life as travertine’s timeless elegance elevates your surroundings to a realm of artistic sophistication. Versatile Usage One of the most remarkable features of travertine slabs lies in their versatility. From grand foyer flooring that leaves a lasting impression to kitchen countertops that effortlessly marry style and functionality, travertine adapts to your vision with remarkable ease. It graces bathrooms with a touch of luxury, transforms accent walls into statements of distinction, and even finds its way into outdoor spaces, creating seamless transitions from indoors to outdoors. This adaptability ensures that whatever your design aspirations, travertine slabs are ready to play a pivotal role in bringing them to fruition. Choosing the Perfect Travertine Slab Embarking on the journey to select the ideal travertine slab for your home is an exciting endeavor, filled with opportunities to curate a space that resonates with your unique style and preferences. To guide you on this path of discovery, let’s explore two pivotal aspects that demand your attention: Consideration Factors and the Varieties Available. Consideration Factors When venturing into the realm of travertine slabs, certain key considerations pave the way for a well-informed decision: Color Palette: Delve into the rich spectrum of travertine colors, ranging from creamy beiges and warm tans to earthy browns and greys. Consider how your chosen hue harmonizes with your existing décor and sets the tone for your space. Finish Options: Travertine slabs offer a variety of finishes, each contributing a distinct character to your design. Choose from polished, honed, tumbled, or brushed finishes, with each reflecting different levels of shine and texture. Size and Layout: The dimensions of your desired slab play a pivotal role in determining the visual impact. Consider the size of the space where the slab will be installed and how various sizes can enhance or complement the overall layout. Vein Patterns: Unique vein patterns and markings are inherent to travertine slabs. These patterns can range from subtle and uniform to bold and dramatic. Visualize how these patterns interact with your design scheme and aesthetic aspirations. Practicality: Assess the intended usage of the slab. Will it grace a high-traffic area like a kitchen countertop or a serene bathroom vanity? The level of footfall and potential exposure to spills or moisture will influence your choice. Varieties Available Travertine slabs, like nature’s artistry, come in a plethora of varieties, each with its own distinct characteristics: Classic Travertine: A timeless choice, classic travertine showcases a neutral color palette with soft, consistent patterns that exude understated elegance. Vein-Cut Travertine: This variety highlights the unique vein patterns, resulting in a striking linear appearance that adds a touch of drama and sophistication. Tumbled Travertine: With a weathered and textured look, tumbled travertine imparts a rustic charm that’s perfect for creating a warm, inviting ambiance. Polished Travertine: Achieve a luxurious, reflective surface with polished travertine, enhancing the stone’s inherent beauty and elevating your space’s opulence. Honed Travertine: A matte finish that exudes subtle refinement, honed travertine offers a smooth texture while showcasing the stone’s natural color variations. In your quest to find the perfect travertine slab, keep these consideration factors and varieties in mind. The interplay between these elements allows you to craft a harmonious blend of aesthetics and functionality, resulting in a space that reflects your personal style while celebrating the remarkable artistry of nature’s gift. Incorporating Travertine Slabs in Your Interior Design Travertine slabs, with their timeless charm and versatile nature, offer a plethora of possibilities to elevate your interior design game. From the grandeur of flooring to the functionality of countertops and the elegance of accent walls, let’s explore how these remarkable slabs can be seamlessly integrated into your living spaces. Flooring Options Transform your floors

A Comprehensive Guide to Travertine Slabs by SF Marble And Granite Inc Read More »

Travertine installation

Travertine Installation: A Comprehensive Guide by SF Marble and Granite Inc

Travertine Installation and Repair Service When it comes to enhancing the beauty and durability of your home, travertine installation is an excellent choice. Travertine is a stunning natural stone, renowned for its elegance, resilience, and timeless appeal. Whether you’re planning to install travertine floors, wall tiles, or pavers, ensuring proper installation and maintenance is crucial to getting the best results. At SF Marble & Granite, we specialize in professional travertine installation and repair services, guaranteeing exceptional craftsmanship and long-lasting beauty. What is Travertine? Travertine is a type of natural stone formed from mineral deposits, typically found near hot springs. Its unique, porous texture gives it a warm, earthy appearance, making it a popular choice for flooring, countertops, and outdoor spaces. Available in a variety of colors and finishes, travertine offers a classic yet versatile look that enhances any space. Travertine is often used for both indoor and outdoor applications, such as travertine paver installation, due to its durability and natural beauty. Benefits of Professional Travertine Installation Proper Leveling and Preparation One of the key factors in a successful travertine tile installation is ensuring that the surface is properly prepared and leveled. Without a stable, even foundation, travertine tiles can shift, crack, or become loose over time. Professional installers will use tools like a plate compactor and a notched trowel to ensure the surface is flat and ready for the tiles, creating a secure, long-lasting installation. Correct Sealing Travertine is a porous material, which means it can absorb stains and moisture if not sealed properly. A professional installation includes the correct application of sealants to protect the stone from damage. This step is crucial in maintaining the longevity and appearance of your travertine surfaces. Sealing also helps prevent stains and etching, especially in high-traffic areas or places exposed to spills. Expert Craftsmanship Achieving the right aesthetic appeal with travertine requires expert craftsmanship. Professionals are skilled in laying tiles in specific patterns, such as the French pattern, to create a stunning visual effect. The precision of cutting, aligning, and setting the tiles ensures not only a beautiful installation but also a durable one that withstands the test of time. Avoiding Common DIY Mistakes Improper installation can lead to a range of problems, including uneven tiles, poor sealing, and weak foundations. These issues often arise in DIY projects due to lack of experience and the use of incorrect tools or techniques. Professional installers avoid these mistakes, ensuring that your travertine floors or pavers are securely and beautifully installed. Travertine Installation Process: Step-by-Step Initial Consultation The installation process starts with an initial consultation. During this phase, we discuss your project, take measurements, and explore design ideas that suit your space. Understanding your vision helps us determine the best approach, whether it’s travertine pavers installation for an outdoor area or indoor flooring. Surface Preparation Before laying the travertine tiles, we ensure the surface is properly prepared. This involves cleaning the area, leveling the surface, and creating a stable base, often with a concrete slab or compacted crushed limestone. Proper preparation prevents future issues like uneven tiles or loose stones. Laying the Tiles Once the surface is ready, the next step is laying the travertine tiles. Using a notched trowel, we apply mortar to set the tiles securely in place. Ensuring each tile is properly aligned and spaced is key to achieving even grout lines and a smooth finish. For paver installation, a rubber mallet is used to carefully set each paver, ensuring it’s firmly placed without damaging the stone. Grouting and Sealing After the tiles are laid, grouting fills the spaces between them. Proper grouting is essential to ensure that the installation is solid and protected. Once the grout is set, the final sealing process begins. Applying a high-quality sealant protects the tiles from moisture and stains, enhancing the durability of your travertine surfaces. Final Touches and Inspection The final step involves polishing and inspecting the installation to ensure everything is flawless. Any excess grout is cleaned, and the tiles are given a final polish to bring out their natural shine. We make sure that the installation meets the highest standards before considering the project complete. Common Travertine Problems and Repairs Even with professional installation, travertine may encounter issues over time. Our travertine repair services address common problems such as: Cracks and Chips Cracks and chips can occur due to heavy impacts or shifts in the foundation. We use specialized materials to repair these imperfections, restoring the stone to its original beauty. Stains and Etching Travertine can be susceptible to stains and etching from acidic substances. Our experts can remove tough stains and restore the surface, giving your travertine a fresh, clean look. Sealing Issues Over time, the sealant on travertine can wear down, leaving the stone vulnerable to moisture and stains. We can assess the condition of the sealant and reapply it to ensure continued protection. Loose Tiles If tiles become loose or start to shift, it’s crucial to address the issue promptly. We secure and replace loose tiles, ensuring the surface remains stable and visually appealing. Maintenance Tips for Travertine To keep your travertine looking its best, regular maintenance is essential. Here are some tips: Routine Cleaning Use a mild, pH-neutral cleaner to clean your travertine surfaces regularly. Avoid acidic cleaners, which can damage the stone. For outdoor travertine paver installations, sweeping away debris and rinsing the surface helps maintain its appearance. Sealing Schedule To protect travertine, it’s recommended to reseal the surface every 1-2 years. Sealing prevents moisture absorption, reduces the risk of stains, and prolongs the life of the stone. Preventing Scratches and Damage Place rugs or mats in high-traffic areas to reduce wear and tear. Avoid dragging heavy furniture across the floor, as this can cause scratches. Use protective pads under furniture legs to prevent damage. Why Choose SF Marble & Granite? At SF Marble & Granite, we take pride in our expertise in travertine installation and repair services. Our team is dedicated to delivering top-quality craftsmanship, using the

Travertine Installation: A Comprehensive Guide by SF Marble and Granite Inc Read More »

Travertine Restoration

Complete Guide to Travertine Restoration for Your Floors

Complete Guide to Travertine Restoration for Your Floors Home Travertine floors add an exquisite touch to any space with their unique patterns and earthy tones. Over time, however, daily wear and tear can diminish their luster and shine. If you’re looking to restore the natural beauty of your travertine floors, you’re in the right place. In this guide, we’ll walk you through the process of travertine restoration, addressing common concerns and providing expert advice to help you revitalize your floors. As you embark on your travertine restoration journey, consider the expertise of SF Marble and Granite Inc. Our dedicated team is committed to bringing back the timeless elegance of your floors. Travertine restoration is not just about aesthetics; it’s about preserving the lifespan of your flooring. Without proper maintenance and care, travertine can lose its shine and become vulnerable to damage. Restoration brings back the original elegance of the stone while enhancing its durability. Understanding the Significance of Travertine Restoration Travertine restoration is not just about aesthetics; it’s about preserving the lifespan of your flooring. Without proper maintenance and care, travertine can lose its shine and become vulnerable to damage. Restoration brings back the original elegance of the stone while enhancing its durability. Step-by-Step Guide to Restoring Your Travertine Floors Assessment and Preparation: Setting the Stage for Restoration Before embarking on the restoration journey, evaluate the condition of your floors. Identify areas with scratches, cracks, or stains. Clear the area and ensure you have the necessary tools and materials for the process. Gentle Cleaning Techniques: Nurturing Your Travertine Start by gently removing dirt and debris from the surface. Use a pH-neutral stone cleaner and a soft mop or cloth. Avoid acidic or abrasive cleaners that can harm the stone. Thoroughly rinse the floor to prevent residue buildup. Repairing Scratches and Cracks: A Flawless Surface For minor scratches, consider using a fine-grit sandpaper or a specialized travertine repair kit. Deeper cracks may require professional attention. Fill the cracks with a color-matched epoxy resin and allow it to cure. Polishing and Honing: Restoring the Lustrous Shine Polishing and honing bring back the glossy finish of your travertine floors. Use a low-grit diamond polishing pad for honing, followed by a higher-grit pad for polishing. Work in small sections and keep the surface wet. Sealing for Longevity: Protecting Your Investment Sealing your travertine floors is crucial to prevent future damage. Choose a penetrating sealer that provides a barrier against moisture and stains. Apply the sealer evenly and allow it to dry completely. Types of Travertine Damage and How to Avoid Them Travertine is a stunning, natural stone that can elevate the beauty of any space. However, like all natural stones, it requires proper care to maintain its elegance and longevity. Without proper attention, travertine can be prone to certain types of damage. Here’s a closer look at some of the most common issues that can affect travertine, and how to prevent them. 1. Etching: The Silent Damage from Acidic Substances Etching is one of the most common forms of damage to travertine and occurs when acidic substances come into contact with the surface. Spilling things like lemon juice, vinegar, wine, or cleaning products containing acid can result in dull, matte spots that strip away the shine of the stone. How to Prevent It: Wipe up spills immediately, especially acidic substances. Use coasters, placemats, or trays for items that might contain acids. Clean with neutral pH stone cleaners designed for travertine. 2. Staining: The Result of Oil and Grease Buildup Stains on travertine can happen for several reasons, but the most common culprits are oils, grease, and food-related liquids. These stains are typically caused by thick water, greasy food, or even burnt-on food after scrubbing. The porous nature of travertine makes it highly susceptible to absorbing these substances, which can leave unsightly marks. How to Prevent It: Seal your travertine to create a protective layer that resists stains. Clean up spills promptly and thoroughly. Avoid placing greasy or oily items directly on the surface. 3. Discoloration and Dullness: The Results of Overzealous Cleaning Cleaning is essential, but when done too aggressively, it can cause microscopic scratches on the surface of your travertine. These tiny scratches can lead to discoloration or a dull, faded appearance. Using harsh cleaners or abrasive tools can also strip the stone’s natural shine, making it look worn. How to Prevent It: Avoid using abrasive scrubbers or acidic cleaners. Use a soft cloth or mop and a pH-neutral stone cleaner. Clean gently to avoid dulling the surface and causing long-term damage. 4. Chips & Scratches: The Consequences of Rough Handling Travertine, while durable, can be chipped or scratched if handled improperly. Dropping heavy items or dragging furniture across the floor can leave noticeable marks or break parts of the stone. These imperfections can ruin the stone’s smooth, elegant finish. How to Prevent It: Be mindful when moving furniture or heavy objects. Consider using felt pads under furniture legs to protect the floor. Handle tiles carefully during installation or renovation. 5. Cracks: A Sign of Improper Installation Cracks in travertine are usually a result of improper installation. If the tiles weren’t set correctly or the subfloor wasn’t properly prepared, the stone can shift and crack under pressure. Uneven surfaces or poor-quality adhesive can contribute to this problem. How to Prevent It: Ensure professional installation by experienced experts. Verify that the subfloor is level and solid before installing travertine. Use high-quality adhesive designed specifically for travertine. The Art of Fixing Scratched Travertine Tile: DIY Tips and Tricks Accidents happen, and scratches on your beloved travertine tiles can be disheartening. Fortunately, there are several DIY methods that you can try before considering professional intervention. These simple yet effective tips and tricks allow you to address minor scratches and restore the allure of your travertine floors without breaking the bank. Baking Soda Magic One popular and gentle method involves the use of baking soda. Create a paste by mixing baking soda with water until it

Complete Guide to Travertine Restoration for Your Floors Read More »

Travertine Pavers

Travertine Pavers: A Timeless Elegance for Your Outdoor Spaces

Travertine Pavers: A Timeless Elegance for Your Outdoor Spaces When it comes to enhancing the outdoor beauty of your home, travertine pavers stand out as an elegant and timeless choice. Their natural beauty and durability make them a popular option for various outdoor applications, including pool decks, patios, walkways, and driveways. In this article, we will explore the world of travertine pavers, covering their benefits, installation, maintenance, and more. When it comes to high-quality outdoor flooring, nothing beats the elegance and durability of Travertine Pavers. At Sf Marble and Granite Inc, we offer an extensive collection of Travertine Pavers that are sure to enhance the beauty and functionality of your outdoor spaces. What Are Travertine Pavers? Travertine pavers are natural stones that originate from limestone deposits. These pavers feature unique patterns and earthy colors that add a touch of sophistication to any outdoor space. Their porous nature allows them to stay cool under the sun, making them an excellent choice for pool decks. The Advantages of Using Travertine Pavers Using travertine pavers offers several advantages, such as: Aesthetics: With a wide range of colors and patterns, travertine pavers can complement any outdoor design scheme. Durability: Travertine is a robust material that can withstand heavy foot traffic and weather conditions. Non-Slip Surface: The natural texture of travertine provides a non-slip surface, making it safe for pool areas. Heat Resistance: Travertine’s ability to stay cool makes it ideal for outdoor spaces in hot climates. Factors to Consider Before Choosing Travertine Pavers Before selecting travertine pavers, consider the following factors: Grade: Travertine pavers come in different grades, with premium grade offering fewer imperfections and a more uniform appearance. Finish: Choose from various finishes like tumbled, honed, or brushed, depending on your desired look. Thickness: The thickness of the pavers will depend on the application and the weight they need to bear. Sealing: Consider sealing the pavers to protect them from stains and maintain their beauty. How to Install Travertine Pavers Installing travertine pavers requires careful planning and execution. Here’s a general guide to the installation process: Preparation: Prepare the base by leveling the ground and ensuring proper drainage. Laying the Pavers: Start from one corner and lay the pavers in the desired pattern, leaving space for jointing. Cutting: Use a wet saw to cut pavers to fit the edges and corners. Jointing: Fill the gaps between pavers with jointing sand. Sealing: Apply a suitable sealer to protect the pavers and enhance their color. Maintaining Your Travertine Pavers Maintaining your travertine pavers is essential to ensure they retain their natural beauty and longevity. With proper care and attention, you can enjoy the timeless elegance of your outdoor space for many years to come. Here are some detailed tips on how to maintain your travertine pavers: Regular Cleaning Regular cleaning is the first step in maintaining your travertine pavers. Sweep the surface regularly to remove loose debris, leaves, and dirt. This simple practice will prevent abrasive particles from scratching the pavers’ surface. Avoid Harsh Chemicals When cleaning your travertine pavers, it is crucial to use mild detergents and avoid harsh chemicals. Acidic or alkaline cleaners can damage the surface and cause etching or discoloration. Instead, opt for a pH-neutral cleaner specifically designed for natural stone. Spill Clean-Up In the event of spills, especially from acidic substances like wine, coffee, or citrus juices, it’s vital to clean them up promptly. Wipe the spill with a soft cloth and a mild detergent. Prolonged exposure to acidic substances can cause stains and harm the travertine. Sealing Applying a high-quality sealer is an integral part of maintaining travertine pavers. Sealing helps protect the stone from water absorption, stains, and discoloration. Depending on the traffic and weather conditions, it is recommended to reapply the sealer every few years. Preventing Stains Prevention is better than cure when it comes to stains on travertine pavers. Use coasters under planters and furniture to prevent rust stains. Additionally, place doormats at entry points to reduce the amount of dirt and debris tracked onto the pavers. Pressure Washing Periodically, you may want to give your travertine pavers a more thorough cleaning. Pressure washing can be an effective method, but it must be done carefully. Use a pressure washer with a low setting and hold it at a reasonable distance from the pavers to avoid causing damage. Removing Tough Stains For stubborn stains that may have developed over time, there are specific poultice powders available for natural stone. Follow the manufacturer’s instructions and test a small area before applying the poultice to the entire stained area. Repairing Cracks and Chips If you notice any cracks or chips in your travertine pavers, it is essential to address them promptly. Small cracks can be repaired using a stone repair epoxy, while larger damages may require professional intervention. Winter Care During colder months, it’s crucial to protect your travertine pavers from potential frost damage. Avoid using rock salt or ice melt products on the surface, as they can cause damage. Instead, use sand for traction and remove snow promptly to prevent water from seeping into the stone. By following these maintenance tips, you can ensure that your travertine pavers remain a stunning focal point of your outdoor space, exuding timeless elegance and adding value to your property. Proper care will not only preserve their natural beauty but also extend their lifespan, making them a wise and worthwhile investment for years to come. Enhancing the Aesthetics of Your Space with Travertine Pavers Travertine pavers offer versatility in design. Consider these tips to enhance your outdoor space: Patterns: Create unique patterns like herringbone or basketweave for visual appeal. Borders: Use contrasting colors or sizes to create stunning borders. Accents: Add decorative accents using different colors of travertine to create focal points. Popular Applications of Travertine Pavers Travertine pavers can be used in various outdoor settings, including: Patios: Transform your patio into a luxurious retreat with travertine pavers. Walkways: Create inviting walkways with the beauty of travertine. Driveways: Make a statement

Travertine Pavers: A Timeless Elegance for Your Outdoor Spaces Read More »

Scroll to Top