Granite is one of the toughest countertop materials available but it is not indestructible. Drop a heavy cast iron pan on the edge, knock a ceramic mug against a corner, or apply enough concentrated impact, and you can chip even the hardest stone. It happens in kitchens every day.
The good news is that knowing how to fix a chip on a granite countertop is a skill any homeowner can develop. Small chips can be repaired at home in under an hour with the right materials. This guide walks you through the full process from choosing the right repair kit to finishing the surface so the chip becomes nearly invisible.
Why Granite Chips Happen

Understanding what causes chips helps you prevent future damage after your repair is complete.
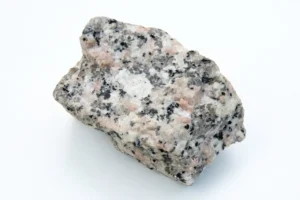
Granite is extremely hard rating 6 to 7 on the Mohs hardness scale. But hardness and brittleness are different properties. Granite resists scratches exceptionally well. Under sharp, concentrated impact particularly at edges and corners where the stone has less material behind it granite can fracture and chip.
The most common causes of granite chips:
- Heavy pots, pans, or appliances dropped on countertop edges
- Ceramic or glass items knocked forcefully against corners
- Impact from tools during renovation work near the counter
- Stress fractures that develop at weak points in the stone over time
- Poor installation where the countertop was not fully supported from below
Edges and corners are the most vulnerable areas. They have less material mass than the flat countertop surface, and concentrated impact at an edge concentrates force at a single thin point. Most granite countertop repair calls involve edge chips rather than surface chips for this reason.
Tools and Materials You’ll Need
Having everything ready before you start prevents stopping mid-repair when the epoxy is curing.
For a DIY Granite Chip Repair
- Granite epoxy repair kit — look for a two-part epoxy that is color-matched or tintable to your stone (Akemi, Tenax, and LTP are reliable brands used by professionals)
- Acetone or denatured alcohol — for cleaning the repair area
- Painter’s tape — to mask around the repair area
- Mixing sticks and small mixing surface — plastic or cardboard works fine
- Plastic scraper or putty knife — for applying and leveling epoxy
- Wet/dry sandpaper — 220, 400, and 600 grit progressively
- Polishing compound — stone polish matching your countertop finish (honed or polished)
- Soft cloths and microfiber towels
- Safety glasses and nitrile gloves
Optional but Helpful
- Color pigments — some repair kits include tinting pigments to better match speckled or multicolored granite
- UV curing light — speeds up the cure on UV-reactive epoxy formulas
- Razor blade — for trimming excess cured epoxy flush before sanding
Product note: Do not use standard household glues, super glue, or caulk for granite chip repair. These products do not bond properly to stone, do not color-match, and fail quickly under kitchen conditions. Use a two-part stone epoxy specifically designed for granite countertop repair.
Step-by-Step Guide: How to Fix a Chip on Granite Countertop
Step 1 — Assess the Chip (5 Minutes)
Before mixing anything, look at the chip carefully under good light.
Determine:
- How deep is the chip? Surface scratches and shallow nicks need minimal fill. Deep chips that remove significant material need multiple thin layers of epoxy.
- Is there a loose piece of stone that came off cleanly? If the chipped piece is intact and available, you can potentially reattach it directly with stone adhesive for an invisible repair.
- What colors are present in the stone at the chip location? Granite is multicolored you need to match the dominant color as well as any secondary flecks or veining in the chip area.
Step 2 — Clean the Repair Area (5 to 10 Minutes)
This step is critical. Epoxy will not bond properly to a dirty, oily, or dusty surface.
Apply acetone or denatured alcohol to a clean cloth and wipe the chip and the surrounding area thoroughly. Let it dry completely acetone evaporates quickly, usually within 1 to 2 minutes.
Do not use water for this cleaning step. Water can remain in the pores of the stone and interfere with the epoxy bond. Acetone cleans and evaporates completely.
Apply painter’s tape around the perimeter of the chip about 1/4 inch back from the edge on all sides. This protects the surrounding stone from excess epoxy and makes cleanup much easier.
Step 3 — Mix the Epoxy (5 Minutes)
Two-part epoxy systems consist of a resin and a hardener. Both parts must be mixed together in the correct ratio typically 1:1 or as specified on your kit instructions. Incorrect ratios prevent the epoxy from curing properly.
Mix on a non-porous surface a piece of cardboard or scrap plastic. Use a clean mixing stick and blend the two parts thoroughly for the full time specified in the instructions, usually 1 to 2 minutes.
Color matching is the most skill-intensive part of the repair. For solid or near-solid colored granite, mixing in the provided tinting pigments to match the stone is straightforward. For multicolored granite with complex patterns, you may need to apply a base color epoxy fill and then stipple secondary color dots into the wet epoxy with a fine brush or toothpick to replicate the stone’s natural pattern.
Take your time with color matching. A rushed color match is the most visible sign of a granite repair.
Step 4 — Fill the Chip (10 to 15 Minutes)
Using your plastic scraper or putty knife, apply the mixed epoxy into the chip. For shallow chips, a single application is sufficient. For deep chips, apply in thin layers build up to slightly above the surface level rather than trying to fill in one thick application. Thick applications can shrink slightly as they cure.
Press the epoxy firmly into the chip to eliminate air pockets. Air pockets in the cured epoxy look like tiny voids and are visible in the finished repair.
Slightly overfill the chip so the epoxy sits just above the surface level. You will sand it flush after curing. It is easier to remove a little extra material than to add more after the first application has cured.
If you saved the original chip piece, now is the time to use it. Apply a thin layer of stone adhesive into the void, press the chip piece firmly into position, and hold it or tape it in place while the adhesive cures. If the fit is good, this method produces the most invisible repair possible.
Remove the painter’s tape while the epoxy is still wet pulling tape off cured epoxy can fracture the repair edges.
Step 5 — Allow Full Cure Time (1 to 24 Hours)
Cure time varies by product and temperature. Most granite repair epoxies reach handling strength in 1 to 4 hours. Full cure typically takes 24 hours.
Do not sand, touch, or load the repair area during cure. Premature contact disrupts the molecular bonding process and weakens the repair.
Work in a warm space most epoxies cure slower in cold conditions. If your kitchen is cold (below 60 degrees Fahrenheit), allow extra cure time before proceeding.
Step 6 — Sand Flush and Polish (20 to 30 Minutes)
Once fully cured, the epoxy will sit slightly above the surrounding granite surface. Sanding it flush creates a smooth, level repair.
Start with 220 grit wet/dry sandpaper, working in a small circular motion directly over the repair. Use light, consistent pressure. Check your progress frequently you want to bring the epoxy level with the surrounding stone without sanding into the granite itself.
Progress through finer grits: 220, then 400, then 600. Each finer grit removes the scratches left by the previous grit and brings the surface to a finer finish.
After 600 grit, switch to a stone polishing compound appropriate for your countertop’s finish:
- For polished granite: use a polishing compound and buff with a soft cloth to restore the high shine
- For honed granite: use a honing compound to restore the matte finish do not polish to a high shine
Buff the repair area and blend into the surrounding surface. Step back and check the repair under different lighting angles natural light, overhead light, and raking side light all reveal different aspects of the repair quality.
You can read about: How To Fix Tiles With Tile Adhesive
Tips for a Better Repair (From Real Experience)
These details make the difference between a repair that is invisible and one that is obvious.
Work in thin layers for deep chips. Thick epoxy applications shrink and crack as they cure. Build up in two or three thin layers for any chip deeper than 1/4 inch. Let each layer cure to handling strength before applying the next.
Use a heat gun or hair dryer to accelerate shallow surface bubbles out of the epoxy before it cures. Hold it 6 to 8 inches from the surface and move it constantly. The gentle heat pops tiny air bubbles that would otherwise remain visible in the cured repair.
Match the sheen carefully. A high-gloss repair on a honed countertop is as obvious as a poorly color-matched one. Match the finish level of the surrounding stone using appropriate sanding and polishing compounds for your specific surface type.
Test your color match on a piece of cardboard before applying to the countertop. Mix a small test batch with your chosen pigment ratio and let it cure. Hold it against the stone in good light before committing to the full repair.
For repairs on countertop edges, create a form using painter’s tape applied just below the edge line to hold the epoxy in place while it cures. Without the tape form, wet epoxy runs off vertical edge surfaces before it can set.
When to Call a Professional Instead
DIY granite repair works well for small chips up to about 1/2 inch in diameter. Beyond that size and complexity, professional stone repair produces significantly better results.
Call a professional for:
- Large chips or chunks — removing a section of material larger than 1/2 inch leaves a void that is difficult to fill invisibly with DIY methods
- Chips in highly visible locations — the center of a countertop run, the main sink edge, or any surface viewed at close range regularly warrants professional attention
- Cracks rather than chips — structural cracks in granite require different repair techniques than surface chips and should always be assessed by a professional
- Failed DIY repairs — removing and re-doing a poorly executed epoxy repair is harder than doing it correctly the first time
- Quartzite repair — quartzite is harder and more complex to repair than granite and benefits from professional handling more often than standard granite countertop repair work
- Stone countertop repair on premium or expensive material — Calacatta, Paonazzo, or other luxury stone deserves professional repair to preserve its full value
Tips to Prevent Future Chips
Once you know how to fix a chip on a granite countertop, you also want to avoid needing that knowledge again.
Protect the edges — they are the most vulnerable part of your countertop. Never drag heavy pots across countertop edges. Always lift and set items down rather than sliding them off the edge.
Use cutting boards and trivets. While granite resists scratches and heat, impact from heavy cookware dropped directly onto the surface concentrates force at a single point. Cutting boards and trivets eliminate that impact risk entirely.
Inspect for stress cracks periodically. Run your fingertip along countertop edges every few months. Small surface stress lines that catch your fingernail are early signs of a developing weak point. Filling them with a thin epoxy application before they become chips is far easier than repairing a full chip later.
Avoid putting heavy objects on unsupported overhangs. Overhangs more than 10 to 12 inches beyond the cabinet edge are partially unsupported. Heavy items placed repeatedly at the end of an overhang concentrate stress at the support point and can cause cracking over time.
Reseal your granite annually. Properly sealed granite has better surface integrity than unsealed stone. The sealer does not prevent chips but it does prevent the micro-porosity that can weaken the surface structure of the stone over time.
Contact SF Marble and Granite for Expert Assistance
Some chip repairs are genuinely straightforward DIY projects. Others whether because of size, location, stone type, or complexity benefit significantly from professional expertise.
SF Marble & Granite provides expert Granite Countertop Repair in Lowell, MA for chips, cracks, surface damage, and full stone restoration. Our repair technicians work with all granite varieties, quartzite, marble, and engineered stone using professional-grade materials and techniques that produce results significantly better than consumer repair kits on complex or large damage.
We also assess repairs honestly. If a chip is small and genuinely DIY-appropriate, we will tell you that. If it requires professional work to look right, we will explain why and give you a clear, fair estimate before any work begins.
Conclusion
Knowing how to fix a chip on a granite countertop gives you a practical skill that saves money and keeps your stone looking its best. Small chips repaired promptly with quality materials and correct technique become nearly invisible. Left unrepaired, chips collect dirt, expand under repeated impact, and compromise the structural integrity of the edge or surface.
The process is straightforward: clean the area thoroughly, fill with color-matched two-part epoxy, cure fully, then sand and polish flush. Take your time with color matching and do not rush the cure. Those two steps determine whether the repair is invisible or obvious.
For larger damage, complex locations, or premium stone where the result really matters, SF Marble & Granite is ready to help. Contact us for professional granite repair that restores your countertop to its original condition.
Frequently Asked Questions (FAQs)
How to fix a chip on a granite countertop without a professional repair kit?
For very small surface nicks less than 1/4 inch clear super glue applied with a toothpick and allowed to cure can provide a temporary fill. Sand flush with fine sandpaper and buff. This is a temporary solution only. For anything larger or more visible, a proper two-part stone epoxy kit produces a significantly more durable and visually acceptable result.
How long does granite countertop repair epoxy last?
A properly executed granite chip repair using quality two-part epoxy lasts many years often the lifetime of the countertop. The repair is typically harder than the surrounding stone once fully cured. Failure occurs when the area was not cleaned properly before application, the epoxy was not mixed correctly, or the repair was stressed before full cure.
Can you repair granite countertop chips yourself if the stone is dark colored?
Yes but color matching is harder on dark granite like Absolute Black or Blue Pearl because the contrast between the epoxy fill and the stone is more visible. Use the darkest tinting pigment available in your repair kit and test the color match on cardboard in natural light before applying to the countertop. Many homeowners with very dark granite prefer professional repair specifically because of the color matching challenge.
Is stone countertop repair different for quartzite versus granite?
Quartzite is harder and more crystalline than granite, which makes it more resistant to chipping but also slightly more difficult to repair when chips do occur. The repair process is similar clean, fill with epoxy, cure, sand, and polish but quartzite’s hardness requires more patience during the sanding and polishing stages to achieve a smooth, flush finish.
How do I know if my granite chip needs professional repair or can be done DIY?
DIY is appropriate for chips under 1/2 inch in diameter with no structural cracking extending from the chip. Professional repair is the better choice for chips larger than 1/2 inch, chips with radiating cracks, chips in highly visible central locations, or any repair on premium stone where a perfect match is important. When in doubt, a professional assessment is free at most stone shops and takes the guesswork out of the decision.