S F Marble & Granite

Granite Fabrication

Top Countertop Patterns

Top Countertop Patterns That Define a Luxurious Kitchen

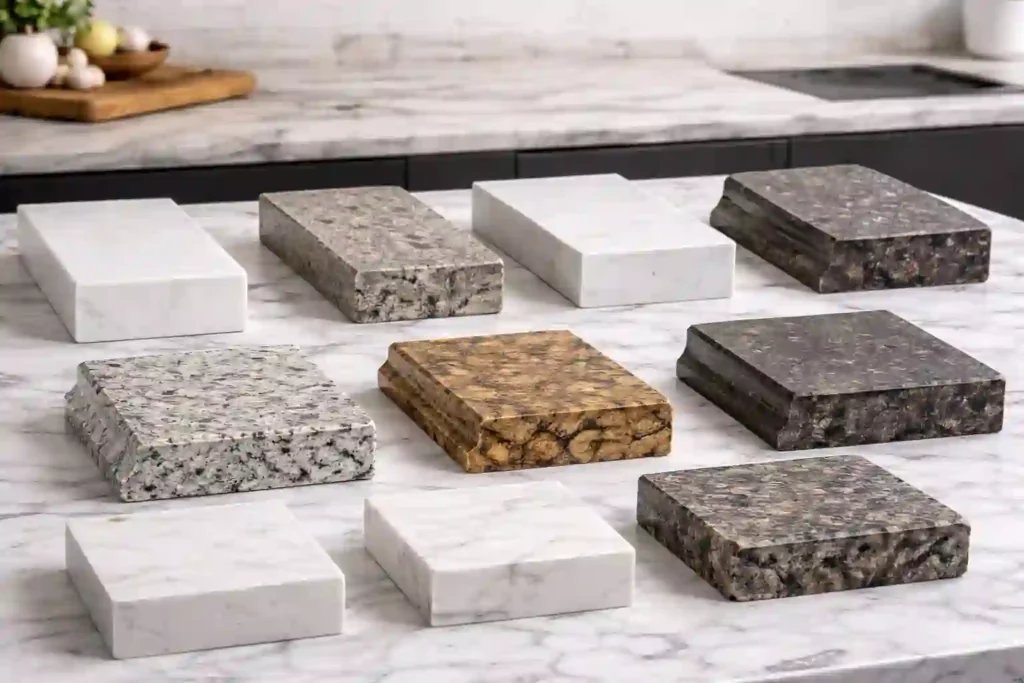
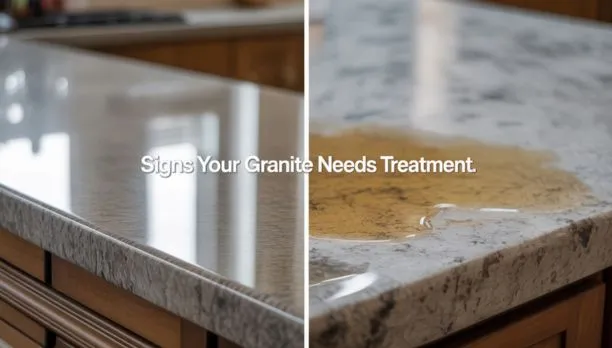
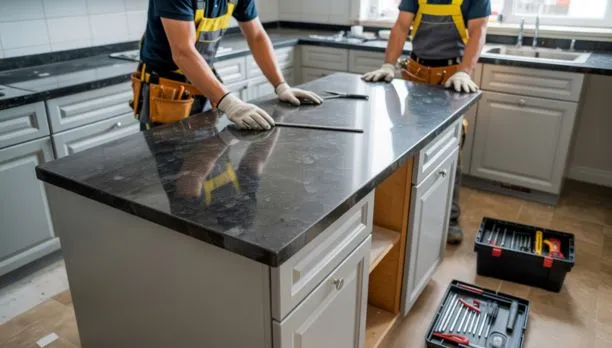
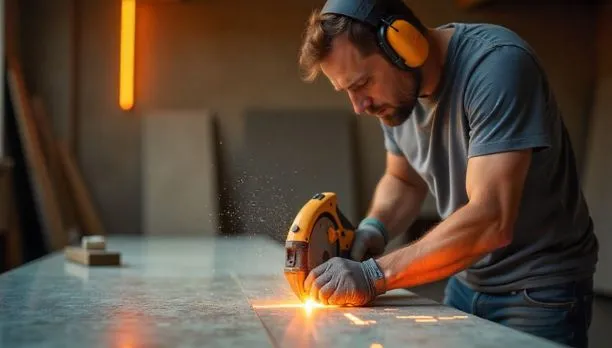
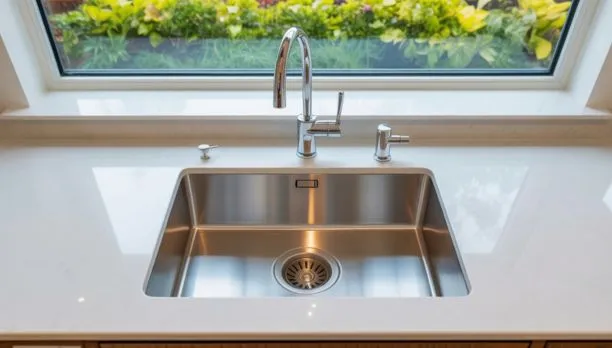
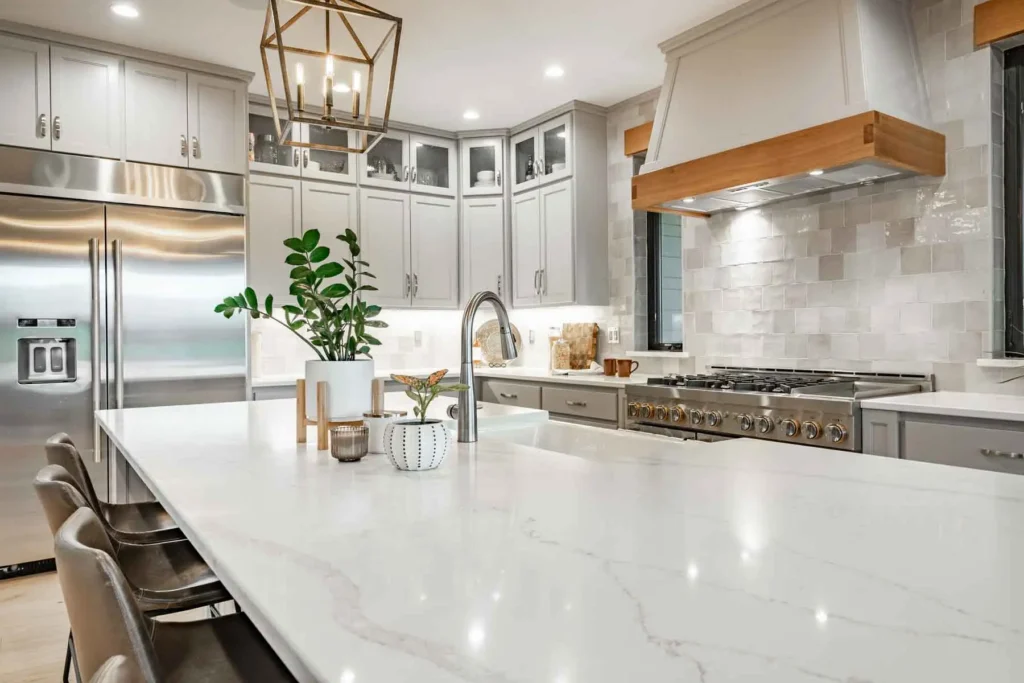
A luxury kitchen is not defined by appliances alone. What truly sets it apart is how every surface works together, especially the countertops. Top Countertop Patterns shape how refined, balanced, and high-end a kitchen feels from the moment you enter. From soft stone movement to bold statement veining, patterns influence light, space, and daily comfort more than most homeowners expect. At SF Marble & Granite Inc, hands-on fabrication and installation experience shows that a beautiful kitchen starts with the right pattern choice, not just the material. Slab selection, precise cutting, and expert installation determine whether a kitchen looks ordinary or truly luxurious. This guide explains how to choose patterns that deliver lasting elegance and value. Why Countertop Patterns Matter in Luxury Kitchens   In a luxury stone kitchen, patterns do more than decorate; they shape how the entire space is perceived. Based on real project experience at SF Marble & Granite Inc, homeowners often underestimate how much the right pattern can transform a kitchen’s look and feel. Plain countertops can feel clean and minimal, but in larger or open kitchens, they may appear flat. Bold patterns, on the other hand, add depth, movement, and character. When natural light hits a well-chosen pattern, it enhances texture and creates a smooth visual flow across the space. Countertop patterns also help balance high-end kitchens. A strong countertop design can ground sleek cabinets, soften sharp edges, and visually connect backsplashes and islands. That’s why luxury kitchen countertops should never be chosen from small samples alone; seeing the full slab pattern makes a noticeable difference in the final result. Popular Countertop Materials and Their Signature Patterns Different materials express luxury in different ways. Understanding how each behaves visually helps homeowners make confident decisions. Granite Countertops Granite is known for natural movement and strength, making it a favorite for upscale kitchen countertops. Speckled granite patterns work well in busy kitchens because they hide crumbs and minor stains. Bold movement granite features dramatic mineral flow, ideal for statement islands. Dark granite with metallic flecks adds richness and depth, especially under warm lighting. Granite is best suited for large kitchens and islands where its natural variation can fully shine. Marble Countertops Marble is timeless and instantly associated with luxury stone kitchens. Soft Carrara-style veining offers subtle elegance and works beautifully in classic or transitional spaces. Bold Calacatta-inspired veining creates high contrast and visual drama. Dramatic bookmatched marble patterns turn islands and backsplashes into true focal points. Marble patterns are especially effective on islands, waterfall edges, and vertical applications where veining can be showcased. Quartz Countertops Quartz delivers consistency with a refined, modern edge, making it popular for luxury kitchen countertops that need lower maintenance. Marble-look quartz mimics natural stone while offering durability. Subtle linear and cloud movement designs add softness without overpowering the space. Consistent patterns are ideal for homeowners who prefer clean, predictable countertop designs. Quartz works well in modern kitchens where balance and ease of care matter just as much as appearance. Top Luxury Countertop Patterns and Styles (Trending Choices) Some patterns consistently define luxury, regardless of kitchen style. Bold Calacatta-inspired veining remains a top choice for statement kitchens. Carrara-style subtle movement suits refined, understated spaces. Dramatic book-matched patterns elevate islands into works of art. Cloud and soft movement patterns create calm, welcoming environments. Nature-inspired earth tones are gaining popularity for warm, organic kitchens. Geometric and art-inspired patterns appeal to homeowners seeking a contemporary luxury countertop with personality. Concrete- and terrazzo-inspired designs can work when an industrial-luxury look is intentional and well-balanced. Matching Countertop Patterns with Kitchen Size & Layout Kitchen size directly affects how patterns read visually. Small kitchens benefit from lighter patterns with gentle movement, which prevents the space from feeling crowded. Open layouts and large kitchens can handle bold, high-contrast countertop designs without feeling overwhelming. Kitchen islands are ideal places to introduce dramatic patterns. A striking island countertop can anchor the entire space while surrounding surfaces remain more subtle. Countertop Patterns vs Cabinets & Backsplash Design Patterns should never be chosen in isolation. Light cabinets pair well with bold or dark countertop patterns for contrast. Dark cabinets often benefit from lighter patterns that prevent the space from feeling heavy. The backsplash should complement and not compete with the countertop. In luxury stone kitchens, vein-matched backsplashes are becoming increasingly popular, creating a seamless and intentional design flow. Seamless Pattern Flow & Slab Selection (Expert Insight) This is where true craftsmanship matters most. A single slab offers the cleanest look, but multiple slabs can still appear seamless with proper vein matching. Bookmatching requires precision cutting and planning to ensure mirrored patterns align perfectly. Professional fabrication is what turns a beautiful slab into a luxury countertop. Services like Granite Fabrication Services in Lowell, MA ensure edges, seams, and pattern flow are handled with care, preserving the natural beauty of the stone. Maintenance Reality of Luxury Countertop Patterns Not all luxury patterns behave the same over time. High-contrast patterns show spills less but can highlight poor seam placement. Soft, light patterns may reveal stains more easily if not sealed properly. Busy kitchens often benefit from patterns that naturally disguise wear. Long-term durability depends on both material choice and proper installation, not just visual appeal. Common Mistakes When Choosing Countertop Patterns Many homeowners rely too heavily on online photos, which rarely show true scale or lighting. Ignoring how lighting affects patterns can lead to disappointment after installation. Another common mistake is overlooking fabrication and installation quality. Even the best countertop designs lose impact when seams are poorly placed or edges are rushed. You may also read: Marble Countertops Pros and Cons How to Choose the Right Countertop Pattern for Your Home Start with your lifestyle. Busy households need forgiving patterns, while show kitchens can embrace drama. Balance your budget by investing where patterns matter most often, the island or main work surface. An expert consultation helps translate inspiration into real-world results, ensuring the pattern fits your space, lighting, and daily use. Final Thoughts A luxury kitchen is

Top Countertop Patterns That Define a Luxurious Kitchen Read More »

Types of Countertop Edges

Types of Countertop Edges: Popular Profiles and How to Choose the Right One

Choosing a countertop is not just about color or stone type. One detail that often gets overlooked but makes a real difference in daily use is the edge profile. The right edge can improve safety, make cleaning easier, and change how your kitchen feels the moment you walk in. That’s why understanding the Types of Countertop Edges is important before you finalize your kitchen or bathroom project. At SF Marble & Granite Inc, we work with homeowners every day who are surprised by how much an edge profile affects both function and style. Based on real fabrication and installation experience, this guide explains popular edge options in simple terms, so you can make a confident, informed choice. What Are Countertop Edge Profiles? Countertop edge profiles are the finished shapes along the exposed edges of your countertop. This is the part you see and touch the most. While it may look like a small detail, the edge affects how the stone handles impact, how safe it is around corners, and how easy it is to maintain over time. Edge selection is not only a design choice. It is also a performance decision. Some edges are stronger for heavy stone slabs, some hide wear better, and others require more skilled fabrication. From our experience working with homeowners at SF Marble & Granite Inc, edge profiles are one of the most important decisions made during fabrication. Why Countertop Edge Profiles Matter in Kitchen Design Safety for Families Sharp corners can be risky, especially in busy kitchens. Rounded profiles reduce the chance of injuries and are often preferred in homes with kids or seniors. Daily Use Durability Some edges resist chipping better than others. The wrong edge on a soft stone can lead to damage over time. Visual Impact Edges help define the overall look. A simple edge feels modern, while a detailed edge adds a classic or luxury touch. Understanding the types of edging for countertops helps balance looks with real-world use. Most Popular Types of Countertop Edges Below are the most requested Types of Countertop Edges, based on real customer preferences and long-term performance. Eased Edge (Straight Edge Countertop) The eased edge is clean, simple, and slightly softened at the corners. Why homeowners choose it: Works well in modern and transitional kitchens Easy to clean Budget-friendly and durable It’s one of the most common types of edging for countertops because it suits almost any material. Beveled Edge Countertop This edge has an angled cut, creating a sharp, decorative line. Best for: Adding detail without heavy curves Highlighting stone patterns It’s one of the preferred types of edges on granite countertops, as granite handles the angled cut well. Half Bullnose Edge Countertop Rounded on top with a flat bottom, this edge offers comfort without looking bulky. Good choice for: Family kitchens Medium-traffic areas The bullnose countertop edge style is popular because it blends safety with a clean look. Full Bullnose Edge Countertop Fully rounded from top to bottom, this edge feels smooth and classic. Why it works well: Safer for soft stones Easy to wipe clean It’s often recommended for marble, where softer edges reduce chipping. Ogee Edge Countertop This decorative, S-shaped edge is known for its elegant look. Important to know: Requires thick slabs Needs expert fabrication Ogee edges are chosen for luxury kitchens and formal spaces. Dupont Edge Countertop A stylish drop-down design with a small curve at the top. Best for: Custom kitchens Homeowners who want a refined edge without going too bold This edge highlights craftsmanship more than most standard options. Mitered Edge Countertop This creates the appearance of a thick slab by joining stone at an angle. Popular for: High-end kitchens Large islands It’s commonly used with granite and quartz for a premium look. Waterfall Edge Countertop The stone continues vertically down the sides of cabinets or islands. Why it’s trending: Strong visual impact Works well in modern homes This is a design-driven choice rather than a practical edge for every kitchen. Cove Edge Countertop A curved edge that slopes inward, making it easy to clean. Ideal for: Traditional kitchens Homeowners who value low maintenance It’s one of the most functional types of edging for countertops. Chiseled Edge Countertop (Natural / Raw Edge) This edge keeps a rough, natural finish. Best suited for: Rustic designs Outdoor kitchens It highlights the natural character of stone rather than polish. Best Countertop Edge Styles by Material Choosing an edge also depends on the stone itself. Granite Countertop Edges Granite is strong and durable, making it suitable for many profiles. Recommended options: Beveled Eased Bullnose These are the most reliable types of edges on granite countertops for long-term use. Marble & Soapstone Edges These stones are softer and benefit from gentle profiles. Best choices: Full bullnose Half bullnose Rounded edges reduce chipping and improve safety. Quartz Countertop Edges Quartz is consistent and engineered, allowing precise shaping. Most popular options: Eased Beveled Mitered Many homeowners ask about the types of edges for quartz countertops because quartz supports clean, modern profiles. Among quartz countertop edges most popular are eased and beveled designs due to durability and cost balance. When reviewing quartz countertop edge options, consistency and maintenance are key factors. Factors That Impact Edge Style Selection Safety and Comfort Rounded edges are safer for daily use, especially in busy kitchens. Ease of Cleaning and Maintenance Simple edges collect less dirt and are easier to wipe down. Design Cohesion with Cabinets & Backsplash Edges should match cabinet style and backsplash thickness for a balanced look. Cost and Fabrication Complexity Detailed edges cost more due to labor and material thickness. This is where professional Granite Fabrication Services in Lowell, MA play an important role in achieving clean, long-lasting results. You may also read: Laminate Countertops vs Granite: Which One Is Better for Your Kitchen? How to Choose the Best Edge for Your Countertops Start by thinking about how you use your kitchen. A high-traffic family kitchen needs durability and safety. A show kitchen can focus

Types of Countertop Edges: Popular Profiles and How to Choose the Right One Read More »

stretta-countertops

Ultimate Guide to Stretta Countertops: Features, Pros, and Installation

Stretta countertops are a modern laminate solution designed to bring the look of stone into your home without the high cost. With their seamless wrap-around edge, durable finish, and stylish patterns, they’ve become a smart alternative to quartz or granite. At SF Marble and Granite Inc., we help homeowners choose surfaces like Stretta that combine beauty, function, and affordability. These countertops are trending in modern kitchens because they offer a balance of style and practicality. Homeowners love that Stretta countertops are easy to install, simple to maintain, and available in on-trend designs such as marble and slate finishes, making them an ideal choice for kitchens of all styles. Key Features of Stretta Countertops Stretta countertops are designed to give your kitchen a flawless, modern look without the high cost of natural stone. At SF Marble and Granite, we recommend them to homeowners who want durability, style, and eco-conscious materials all in one. Seamless Wrap-Around Edge Design A stretta countertop offers smooth, seamless edges that mimic the clean finish of premium stones like white granite. This design creates a polished look and eliminates visible lines. Durable Laminate Construction Made with strength in mind, stretta countertops are resistant to stains and light scratches, making them a reliable choice for everyday use. Eco-Friendly Materials Each stretta countertop is crafted using sustainable core materials, making them an environmentally responsible option. Stretta countertops provide the best combination of style, durability, and sustainability. Perfect for homeowners who desire the look of stone without its price tag; Stretta provides both beauty and practicality in one package. Benefits of Stretta Countertops Selecting the ideal surface can make all the difference in your kitchen design. Stretta countertops stand out due to their combination of affordability, style and durability that provides homeowners with an economical alternative to costly stone or epoxy finishes. Affordable Compared to Stone Unlike granite or quartz, Stretta is a laminate solution that delivers the look of premium stone without the heavy price tag. Options like stretta white marble give your space the upscale feel of natural stone while staying budget-friendly. Easy to Install (DIY-Friendly) One of the biggest advantages of stretta countertops is their simple installation. Many homeowners enjoy the DIY-friendly process, which saves both time and money compared to more complex surfaces. Low-Maintenance Surface Stretta is designed for busy households. The surface is easy to clean, resists everyday stains, and doesn’t require sealing like natural stone or epoxy countertops. Wide Range of Designs and Colors From classic marble looks to modern patterns, stretta countertops are available in a variety of shades and finishes. Whether you prefer something bright and green or a timeless marble look, Stretta makes it easy to match your personal style. Stretta countertops combine beauty, practicality, and cost-efficiency into an excellent addition for kitchens, bathrooms, or any space requiring an attractive yet long-lasting surface. Stretta Countertop Colors and Patterns One reason homeowners love stretta countertops is the variety of colors and patterns available that fit seamlessly with any kitchen design. From classic stone looks to modern shades, stretta laminate countertops give you the flexibility to match your personal style without overspending. White Marble Look If you want timeless elegance, the white marble style is a perfect choice. It mirrors the beauty of popular granite colours while giving you a smooth, modern surface that’s easy to clean and maintain. Manhattan Pearl This option brings a soft, neutral tone to your kitchen, creating a warm and inviting space. It’s an excellent treat for homeowners who prefer a minimalist design that still feels luxurious. Alabaster Slate With its bold slate-inspired design, Alabaster Slate is perfect for contemporary kitchens. It pairs beautifully with stainless steel appliances like your dishwasher, adding depth and contrast to the space. Urban Graphite For those who love dark tones, Urban Graphite delivers a sleek and modern finish. It works well in open kitchens, giving a bold statement that resembles high-end stone. Stretta countertops’ wide variety of patterns makes it simple and cost-effective to achieve any look you desire, from bright to classic and bold styles. Stretta Countertop Installation Installing stretta countertops is simpler compared to natural stone. Many homeowners choose them because they don’t require complex granite fabrication or specialized tools from stone suppliers. Tools and Preparation Needed Basic tools like a saw, measuring tape, adhesive, and clamps are usually enough. Unlike stone, you don’t have to worry about asking how heavy are they? since Stretta is much lighter and easier to handle. Step-by-Step Installation Process Measure your space, cut the strata countertops to size, apply adhesive, and secure them in place. The seamless wrap-around edge makes the fit clean and professional-looking. DIY vs. Professional Installation While DIY installation is possible for handy homeowners, hiring a professional ensures perfect cuts and alignment. At SF Marble and Granite, we recommend expert installation for larger kitchens to guarantee a flawless finish. In short, stretta countertops are one of the most user-friendly surfaces to install, giving you flexibility whether you go DIY or professional. You May Also Read: How Thick Are Granite Countertops? Pros and Cons of Stretta Countertops Like any surface, stretta countertops come with both benefits and limitations. Understanding these helps you decide if they’re the right fit for your kitchen. Advantages Affordable compared to natural stone like black granite. Lightweight and easy to install, with no need for heavy lifting or granite repair. Stylish options that mimic marble, granite, and other premium looks. Limitations and Drawbacks Not as heat-resistant or long-lasting as real stone. Can be scratched or chipped if not treated with care. Limited lifespan compared to natural granite or quartz. In short, stretta countertops are perfect for budget-friendly remodels, but homeowners who want lifetime durability may prefer natural stone. Maintenance and Care Tips Keeping stretta countertops in great shape is simple with the right routine. Unlike heavy stone that requires sealing or special granite installation techniques, Stretta is designed for easy upkeep. Daily Cleaning Wipe with a soft cloth and mild soap. Avoid harsh chemicals that can dull the

Ultimate Guide to Stretta Countertops: Features, Pros, and Installation Read More »

epoxy-for-granite-seams

Epoxy for Granite Seams: The Complete Guide to Seamless Countertop Repair

Epoxy for granite seams is the best way to keep countertops smooth, strong, and attractive. At SF Marble & Granite Inc., we know that seams naturally appear where two granite slabs meet, and while they’re a normal part of installation, they can sometimes become more visible with use. Over time, these seams may collect dirt, absorb moisture, or even weaken due to daily kitchen activity and the settling of cabinets. Repairing and maintaining them with the right epoxy not only restores a seamless look but also protects your granite countertops for long-lasting beauty and durability. What Is Epoxy for Granite Seams? Epoxy for granite seams is a strong adhesive used to bond and fill the gaps between granite slabs. At SF Marble and Granite, we rely on this solution because it not only strengthens the joint but also blends naturally with the stone, giving your countertops a seamless and polished appearance. Benefits of Using Epoxy Over Other Fillers Creates a durable bond that lasts for years Can be color-matched for a natural look Resists heat, water, and daily wear Works well for granite repair epoxy and epoxy countertop fixes More reliable than caulk or regular glue Epoxy is also versatile enough to be used in marble epoxy applications and even in concrete floor repair, making it the preferred choice for both homeowners and professionals. When applied correctly, it restores strength and beauty to granite surfaces while keeping seams nearly invisible. Types of Epoxy for Granite Seams When it comes to repairing or blending seams, the right epoxy for granite seams makes all the difference. Every countertop is unique, so choosing the correct epoxy type ensures that the repair is both durable and visually seamless. Many homeowners consider options like countertop colour change or chip repair, but often a simple seam treatment with the right epoxy can restore the look without major renovations. Common Types of Granite Seam Epoxy Clear Epoxy: Ideal for light-colored stones or when a natural, glass-like finish is desired. Color-Matched Epoxy: Can be tinted to blend perfectly with granite patterns, hiding seams. Quick-Setting Epoxy: Ideal for small repairs and fast jobs where curing time matters. Long-Curing Epoxy: Provides stronger bonding and is often used for professional countertop installations. Choosing the right granite seam epoxy depends on the project’s needs. For example, if you’re wondering how heavy they are when dealing with large slabs, a long-curing epoxy may be best because it offers maximum strength for supporting the weight. On the other hand, for a quick chip repair, a fast-setting product can deliver excellent results. With the right choice, your seams remain strong, invisible, and long-lasting. How to Choose the Right Epoxy Picking the right epoxy for granite seams is the key to achieving a flawless and long-lasting repair. Since granite slabs naturally meet at joints, the adhesive you select should not only bond strongly but also blend smoothly with the stone. Whether you’re looking to treat existing seams, remove visible cracks, or install new countertops, the right epoxy makes all the difference. Key Factors When Selecting Granite Joint Epoxy Matching Color and Texture: Choose an epoxy that can be tinted to match your granite’s shades and patterns for a natural, invisible finish. Durability and Resistance: Ensure it can withstand heat, moisture, and daily use without breaking down. Ease of Application: Look for epoxies that mix easily, spread smoothly, and cure at a manageable pace for your project. The best granite joint epoxy will seamlessly blend strength with appearance. By focusing on color match, resistance to kitchen conditions, and ease of application, homeowners can keep countertops looking like they were never repaired. With the right choice, your granite seams remain strong, attractive, and built to last. You May Also Read: How Thick Are Granite Countertops? Step-by-Step Process of Applying Epoxy Applying epoxy for granite seams is a simple process when done with the right preparation. Proper technique ensures a seamless bond that not only strengthens the stone but also keeps your countertops looking natural. Whether the seam is near a dishwasher, an undermount sink, or an edge that has slightly decomposed over time, careful application makes the repair last. How to Apply Epoxy for Granite Seams Cleaning and Preparing the Seam: Remove dirt, grease, and loose particles to ensure the epoxy bonds well. Mixing Epoxy Properly: Combine the resin and hardener in equal parts until smooth and consistent. Applying and Leveling: Spread the epoxy into the seam evenly and use clamps or seam setters to align slabs. Curing and Finishing Touches: Allow enough time for curing, then scrape off excess and polish for a flawless finish. When applied correctly, epoxy for granite seams creates a bond that blends seamlessly with the countertop. The process not only restores strength but also gives the surface a polished, professional look, ensuring your granite continues to serve both beauty and function in your home. Pro Tips for Seamless Results Getting the best finish with epoxy for granite seams comes down to technique and detail. Even during professional countertop installation, small adjustments make a big difference in how natural and polished the seams appear. Many homeowners searching for granite countertops near me want not just durability, but also a flawless finish that hides seams completely. Tips for Perfect Seam Repairs Using Pigments for Natural Look: Add small amounts of color to match the unique shades and veining of your granite. Preventing Air Bubbles: Mix epoxy slowly and apply carefully to avoid tiny gaps that weaken the bond. Blending Epoxy with Polish: After curing, polish the seam area to merge the epoxy with the natural surface shine. By following these steps, epoxy for granite seams becomes almost invisible, leaving your countertops with a clean, continuous look. The right technique ensures your granite not only stays strong but also enhances the overall beauty of your kitchen or bathroom space. Common Problems and Solutions Even with high-quality epoxy for granite seams, certain challenges may appear if the repair or installation isn’t done properly. Issues like misalignment,

Epoxy for Granite Seams: The Complete Guide to Seamless Countertop Repair Read More »

How Heavy Are Granite Countertops

How Heavy Are Granite Countertops? Weight by Size, Thickness, and Slab

When planning a kitchen remodel, one of the first practical questions homeowners ask is: How Heavy Are Granite Countertops? This question matters because weight affects cabinet strength, safe installation, transportation, and long-term durability. Granite is widely known for its natural beauty and strength, but many homeowners still ask, is granite heavy and whether their existing cabinets can support it.  Understanding the granite weight per square foot helps prevent structural issues and unexpected costs. In this guide, we will explain real numbers, practical examples, and what you need to know before installing granite countertops in your home. How Heavy Are Granite Countertops? Granite is a natural stone formed under intense heat and pressure. Because of its density, it is heavier than most countertop materials. At SF Marble & Granite Inc, we help homeowners understand the granite weight per square foot so they can plan their kitchen project properly and avoid structural or installation surprises. Average Weight Per Square Foot The weight of granite per cubic foot is typically around 165–175 pounds. From that, we calculate surface weight based on thickness. 2 cm (¾ inch) Granite Weight Approx. 12–13 pounds per square foot Common in bathrooms and vertical applications Often requires plywood support underneath 3 cm (1¼ inch) Granite Weight Approx. 18–20 pounds per square foot Most common for kitchens Usually installed without plywood So if you’re asking, how much does granite weigh per square foot, the answer depends on thickness. But on average, expect between 13 and 20 lbs per square foot. That’s why many homeowners ask again: Is granite heavy? Yes, but it is manageable when installed correctly. Total Weight of a Full Granite Slab A standard granite slab measures roughly: 9 to 10 feet long 5 to 6 feet wide 2 cm or 3 cm thick A full 3 cm slab can weigh 700–1,000 pounds. That number often surprises people who ask, how heavy is granite compared to other materials? The answer: significantly heavier than laminate or solid surface. Example Weight Calculation Let’s say you have 50 square feet of countertop space: 50 sq ft × 18 lbs (3 cm granite) = 900 pounds total This gives you a clear idea of the overall kitchen weight. Granite Countertop Weight by Kitchen Size To make it easier, here are common kitchen examples. Small Kitchen (30 sq ft) 3 cm granite: ~540 pounds Medium Kitchen (50 sq ft) 3 cm granite: ~900 pounds Large Kitchen with Island (70 sq ft) 3 cm granite: ~1,260 pounds When homeowners hear these numbers, they often ask again: Is granite heavy for cabinets? In most cases, standard kitchen cabinets are built to support this load. Factors That Affect Granite Countertop Weight Not every project weighs the same. Several elements influence final weight. Slab Thickness (2 cm vs 3 cm) Thickness is the biggest factor. 2 cm granite weighs less but needs support. 3 cm granite weighs more but is structurally stronger. Most kitchens use 3 cm because it balances durability and stability. Countertop Size and Layout More surface area means more total weight. L-shaped kitchens, U-shaped kitchens, and islands increase weight quickly. Edge Profiles and Custom Fabrication Thicker edges, laminated edges, and decorative profiles add material. Custom fabrication slightly increases total weight. Cutouts for Sink and Cooktop Cutouts actually reduce weight slightly. However, they create stress points that require reinforcement during installation. Granite vs Other Countertop Materials (Weight Comparison) Understanding comparisons helps homeowners make informed choices. Granite vs Quartz Quartz has a similar density. In fact, quartz typically weighs: 18–23 pounds per square foot (3 cm) So, when asking how heavy is granite compared to quartz? The difference is minimal. Granite vs Marble Marble’s weight per square foot is very close to granite’s. Both are natural stone and dense materials. Granite vs Laminate Here’s where weight changes significantly. Laminate countertop weight per square foot is only: 2–4 pounds per square foot That is much lighter than granite. So if you compare the laminate countertop weight per square foot with granite, the laminate is dramatically lighter. But laminate lacks the durability and lifespan of natural stone. This is often when homeowners understand why granite feels solid and long-lasting. Do Granite Countertops Require Extra Support? The short answer: usually no if cabinets are properly built and level. Cabinet Strength Requirements Standard modern kitchen cabinets are designed to hold granite weight. If cabinets are: Securely anchored Level Structurally sound They can support typical granite loads without issues. Support for Overhangs and Islands Overhangs over 10–12 inches need support brackets. Examples: Breakfast bars Large islands Seating areas Without support, weight distribution can cause stress cracks. Brackets and Reinforcement Options Common support solutions include: Steel countertop brackets Hidden island supports Corbels Reinforcement rods Before installation, cabinets are carefully assessed to ensure they are level, secure, and strong enough to support the weight of granite, helping prevent structural problems later. How Granite Weight Impacts Installation Weight directly affects installation planning. Professional Installation Requirements Because a single slab can weigh hundreds of pounds, granite installation requires: Multiple trained installers Proper lifting tools Safe handling techniques DIY installation is not recommended. If you are planning a remodel and need expert help, consider professional Countertop Installation Lowell, MA services to ensure proper structural support and safe installation. Transportation and Handling Granite must be transported vertically on A-frames. Improper handling can cause cracks before installation. Structural Considerations for Remodels If installing granite in older homes: Check the cabinet condition Confirm floor stability Inspect wall anchoring These steps ensure the structure supports the full granite load safely. You may also read: How to Treat Granite Countertops Why Granite Countertops Are Worth the Weight Yes, granite is heavy. But weight is part of its value. Strength and Durability Granite resists: Scratches Heat Daily wear Its density gives it strength. Long-Term Value Granite can last decades with proper sealing. Many homeowners view it as a permanent upgrade. Natural Beauty Each slab is unique. Patterns and veining cannot be replicated exactly. This combination of strength and beauty explains

How Heavy Are Granite Countertops? Weight by Size, Thickness, and Slab Read More »

how-to-treat-granite-countertops

How to Treat Granite Countertops | A Complete Step-by-Step Guide

How to treat granite countertops is a question every homeowner should consider if they want to keep their kitchen surfaces strong, shiny, and stain-free. Granite is naturally durable, but as a porous stone, it requires proper care and sealing to maintain its beauty over time. Without regular treatment, spills from water, oil, or acidic liquids can seep into the surface, leaving stubborn marks. At SF Marble and Granite Inc., we’ve seen how consistent sealing and maintenance can protect countertops from everyday wear while enhancing their natural elegance. Proper treatment not only preserves the stone’s rich color and polished finish but also extends its lifespan, ensuring your investment continues to add value and style to your home. Signs Your Granite Needs Treatment When learning how to treat granite countertops, it’s important to spot early signs that your stone needs care. At SF Marble and Granite, we remind homeowners that knowing how to care for granite countertops starts with simple checks. Water Absorption Test Drop a little water on the surface. If it darkens or soaks in, it’s time to reseal. Stains or Dull Look Oil marks, water spots, or a faded shine show the seal is wearing off. Resealing Frequency Most granite needs sealing every 12–18 months. Usage, stone type, and cleaning products can shorten this timeline. If you’re looking for trusted stone suppliers or searching for granite countertops near me, make sure you work with experts who can guide you on the right maintenance schedule. Preparing the Countertop Surface Before beginning how to treat granite countertops, the surface must be correctly prepared. A clean and dry base ensures sealers work effectively while protecting the stone. Many homeowners ask How can you clean granite before sealing? The answer lies in using appropriate methods and tools. Steps to Prepare Granite Clean with warm water and mild dish soap Wipe using a soft microfiber cloth Let the surface dry completely before sealing Gather materials: gloves, sealer, cloths, spray bottle Check corners and edges for hidden moisture Proper preparation makes a big difference. Whether you’re planning to install granite, remove granite, or add appliances like a dishwasher, following these steps ensures your countertops stay in top shape for years. Choosing the Right Granite Sealer One of the most important steps in how to treat granite countertops is selecting the right sealer. Granite is durable, but being a natural stone, it needs proper protection to remain flawless over time. The right sealer not only safeguards against stains and moisture but also makes everyday care easier. Homeowners who want to know how to maintain granite countertops must start with this choice. Penetrating Sealers vs. Topical Sealers Penetrating Sealers: Absorb into the stone, protecting it from the inside out. Best for long-lasting defense. Topical Sealers: Sit on the surface, adding a temporary barrier and extra shine. They may wear off faster. Factors to Consider Porosity: More porous stones need stronger, penetrating sealers. Finish: Polished granite may need a lighter seal, while honed finishes absorb more. Usage: Kitchens with heavy cooking require stronger protection compared to low-use spaces. Safety Precautions When Handling Sealers Always work in a well-ventilated area Wear gloves to protect your hands Keep sealers away from children and pets Follow the manufacturer’s directions carefully Choosing the right sealer ensures your popular granite surfaces stay vibrant and smooth. With proper sealing and regular countertop installation support from experts, your stone will remain both practical and beautiful. Taking the time to pick wisely guarantees that your granite looks flawless and stays protected for years to come. Step-by-Step Sealing Process Learning the proper way to treat granite countertops requires understanding their sealing process as well. This step is what gives your stone lasting protection and keeps it looking polished, whether you have grey or black granite in your kitchen. Even during granite fabrication, sealing is recommended as a finishing touch to strengthen the stone. Key Steps in Sealing Granite Applying the First Coat Evenly – Use a clean cloth or applicator pad to evenly spread sealer across the entire surface, working in small sections to avoid missing spots. Allowing Absorption Time – Let the sealer sit for about 15–20 minutes so it can penetrate the pores of the granite. Wiping Off Excess – Remove any leftover sealer with a soft cloth to prevent cloudy marks or haze. Applying a Second Coat if Needed – For lighter or more porous stones, repeat the process for extra protection. Sealing your countertops correctly ensures the stone stays strong against stains, spills, and daily wear. Whether your kitchen design includes black granite for bold style or grey granite for a softer look, following these steps will help your countertops stay beautiful and well-protected for years. Curing and Post-Sealing Care Understanding how to treat granite countertops doesn’t stop with applying a sealer; the curing stage is equally essential in creating an impenetrable shield against stains, spills, and everyday wear-and-tear. Whether your granite has an undermount sink cut or a custom edge, proper curing makes the difference between short-term protection and long-lasting results. Post-Sealing Guidelines Recommended Curing Time – Allow the countertops to rest for at least 24 hours before heavy use. Avoid placing appliances, cooking, or cleaning during this period. Re-Testing the Seal – After curing, perform the simple water test again. If water beads on the surface, the seal is effective. If it absorbs, another coat may be required. Giving your granite enough time to cure prevents the surface from looking decomposed or patchy over time. By following these steps, you ensure that every cut of your stone, from smooth edges to detailed finishes, remains well-protected and beautiful. Daily and Routine Maintenance A big part of learning how to treat granite countertops is practicing daily care. Even the toughest stones, like white granite, can lose their shine or even change colour over time if not maintained properly. Consistent cleaning and timely granite repair when needed will keep your countertops looking new for years. Proper Cleaning Methods Use warm water with a

How to Treat Granite Countertops | A Complete Step-by-Step Guide Read More »

how-to-remove-granite-countertops

How to Remove Granite Countertops Safely and Easily

How to remove granite countertops is a task many homeowners face when remodeling their kitchens or repairing cabinets. At SF Marble and Granite Inc., we know granite is strong and beautiful, but when it’s time for a new look or structural updates, safe removal is the first step. People usually remove granite countertops to upgrade to modern designs, replace damaged cabinets, or even reuse the slab in another space. Taking out granite incorrectly can cause cracks in the stone, damage to cabinets, or costly repairs. That’s why it’s essential to follow the correct process and utilize the proper tools. In this guide, we’ll share a clear, step-by-step approach that makes the removal easier, safer, and more effective so you can move forward with your project confidently. Reasons for Removing Granite Countertops Many homeowners search for how to remove granite countertops when planning kitchen updates or tackling repairs. At SF Marble and Granite, we know granite is durable and stylish, but sometimes it no longer fits your design or functional needs. Whether you want a fresh look or need access to the cabinets below, there are several reasons people consider removal. Outdated design or color preference that no longer matches your style Replacing granite with other materials like quartz or marble from trusted stone suppliers Repairing damaged cabinets or fixing sink issues hidden beneath the stone Repurposing slabs into other spaces with a flawless removal process Recycling granite to create new surfaces in different popular colours Learning how to take off granite countertops isn’t just about removing stone; it’s about creating new possibilities for your home. With careful planning, the process opens the door to upgrades that enhance both style and function. Tools and Materials Needed Before starting the process of how to remove granite countertops, it’s important to gather the right tools. Granite is heavy, strong, and often bonded tightly during granite fabrication, so the proper equipment ensures both safety and efficiency. Without the right gear, removing granite countertops can easily lead to cracked slabs or damaged cabinets. Safety Gear – Gloves, goggles, and a dust mask are must-haves. Granite dust and sharp edges can pose risks, especially when handling large slabs of granite in kitchen settings. Hand Tools – A utility knife helps cut caulk, while a pry bar, hammer, and chisel make it easier to separate the stone from cabinets. Removal Aids – Suction cups and wedges assist in lifting and loosening, while a slab dolly is useful for transporting heavy pieces like a grey granite slab. Optional Power Tools – Tools like an oscillating or reciprocating saw can speed up the removal process for adhesive or screws that have set hard. By preparing these tools in advance, you’ll make the job of removing granite countertops smoother and safer. The right equipment not only protects your stone but also ensures the process is manageable from start to finish. Preparing the Workspace Before beginning to learn how to remove granite countertops, setting up your workspace is the first essential step. Doing this not only protects your home but also makes the process safer and more efficient. Whether you are upgrading from laminate to natural stone or planning a full remodel, this stage is just as important as the removal itself. Clearing Surrounding Items and Appliances – Remove small appliances, dishes, and any fragile items from the kitchen. This prevents accidents and gives you more room to maneuver while working. Shutting Off Water and Disconnecting Plumbing – Always turn off water valves before detaching sinks and faucets. This step is critical to avoid leaks, especially if you plan to perform granite repair or reinstall a sink afterward. Protecting Floors and Nearby Surfaces – Cover your flooring and cabinets with protective sheets or cardboard. A slab, even something as stunning as Pitaya White, is heavy and can cause scratches if mishandled. Taking time to prepare ensures that when you move forward with how to uninstall granite countertops, you won’t be dealing with unnecessary damage or safety risks. A clean, protected workspace helps the project go smoothly from start to finish. Step-by-Step Process to Remove Granite Countertops Homeowners typically expect the removal of granite countertops to be an effortless endeavor; however, taking careful steps is necessary to prevent damage to surfaces. Just like planning backsplash ideas or preparing to install granite countertops, the process needs patience, the right tools, and a team approach. Here’s a clear breakdown of the removal steps: Disconnect Plumbing and Appliances – Start by shutting off water lines and detaching plumbing fixtures. Remove the sink, faucet, and any appliances connected to the countertop. This step prevents leaks and creates space for removing granite countertop slabs safely. Cut Through Caulk and Adhesive – Use a utility knife to slice through the caulk along edges, backsplashes, and around the sink cutout. If the seal is stubborn, apply a caulk softener for easier separation. Loosen Granite from Cabinets – Insert a pry bar or wedges slowly between the granite and cabinet frame. Work around the slab gradually to prevent cracks or damage to cabinets. Lifting and Removing the Slab – Granite is heavy, so use suction cups for grip and lift with at least two or three people. For larger slabs, place them on a dolly to move them safely out of the kitchen. By following these steps, you’ll understand not only how to remove granite countertops but also how to protect your kitchen in the process. Whether you’re planning to reuse the stone or search for granite countertops near me for a brand-new look, careful handling ensures a smooth transition to your next project. Special Cases to Consider Not every project of how to remove granite countertops goes the same way. While some slabs lift off smoothly, others present challenges that require extra care. Factors like installation method, materials used, and the condition of your cabinets can affect the removal process. Here are a few special cases homeowners often encounter: When Granite Is Screwed into Plywood – Some countertops

How to Remove Granite Countertops Safely and Easily Read More »

how-long-does-it-take-to-install-granite-countertops​

How Long Does It Take to Install Granite Countertops?

How long does it take to install granite countertops? At SF Marble and Granite Inc., we know this is one of the biggest concerns homeowners have before starting a renovation. The installation timeline is important because it helps you plan your kitchen or bathroom upgrade with less stress. Knowing how long each step takes from measuring to the final polish gives you a clear idea of when your space will be ready to use. On average, the entire process can take a few weeks, while the actual installation typically finishes in just one day. The timing may vary depending on factors like project size, cabinet readiness, and the complexity of your granite design. By understanding the expected duration, you can prepare your home, coordinate with contractors, and enjoy a smooth transition to your new countertops. What the Granite Countertop Installation Process Involves When homeowners ask, How long does it take to install granite countertops?, the answer depends on each stage of the process. At SF Marble and Granite, we make sure every step is handled with precision and care. Consultation & Selection – Pick your slab, finish, and edge style. Templating – Accurate measurements for sinks and appliances. Granite Fabrication – Cutting, polishing, and shaping the slab. Preparation & Removal – Old countertops removed, cabinets leveled. Installation – Granite is placed, seams are aligned, and adjustments are made. Sealing & Cleanup – Surface sealed, polished, and space cleaned. Each step from granite fabrication to sealing affects the overall timing. With expert guidance from SF Marble and Granite, your change countertop project is completed smoothly, leaving you with a durable and elegant finish. Average Time Required for Each Stage Homeowners frequently inquire, “How long will it take to install granite countertops?” The timeline will depend on several factors, including project size and scope, as well as any extra work, such as backsplash or cabinet prep, that needs to be done. At SF Marble and Granite, we guide you through each stage of your countertop install so there are no surprises. Templating: Usually 1–2 hours for accurate measurements. Fabrication: About 1–2 weeks for cutting and polishing flawless granite or Gold slabs. Removal: 1–2 days to take out old counters and remove tile backsplash if needed. Installation: 4–7 hours to set, level, and secure slabs. Finishing: 1–2 days for sealing, polishing, and curing. In most cases, the entire process takes 2 to 3 weeks, with installation itself completed in just a day. Understanding these steps helps you see exactly how long it takes to install granite countertops and plan your renovation with confidence. Total Timeline: From Start to Finish The complexity of the design and any extra work, such as fitting an undermount sink or making adjustments for plumbing. At SF Marble and Granite, we make sure your granite countertop installation stays on track with realistic timelines. Short-term projects: Small kitchens or bathrooms may be completed in about 2–3 weeks. Larger kitchens: Bigger layouts with cutouts and detailed edges can take closer to 4–6 weeks. Best-case scenarios: Quick slab availability and level cabinets allow faster installation. Delays: Custom edges, granite repair, or last-minute design changes may extend the process. In general, homeowners searching for granite countertops near me should expect the full process to take anywhere from 2 to 6 weeks. Prep and fabrication will usually extend the timeline beyond just installation day, helping you set realistic expectations and ensure a more successful renovation experience. Key Factors That Influence Installation Time If you’re asking How long does it take to install granite countertops? The answer can vary based on several factors. At SF Marble and Granite, we pay careful attention to every aspect of your project to ensure its completion with precision and on schedule. Project size: Larger kitchens require more time to measure, fabricate, and cut countertops. Design details: Custom edges, sink cutouts, and unique finishes like honed granite add to the timeline. Material availability: If your chosen slab is in stock with the stone supplier, the process moves faster. Cabinet readiness: Cabinets must be leveled and secured before installation. Installer’s schedule: A busy granite countertops installer may affect the lead time. Site conditions: Plumbing, electrical, or uneven surfaces can slow down progress. Each element directly affects the schedule for installing granite countertops in real-life scenarios, and understanding them helps homeowners better plan for their renovation and estimate an installation time frame. Common Delays and How to Avoid Them At SF Marble and Granite, we’ve seen how planning can prevent most delays and keep your change countertop project on schedule. Late slab delivery: Special colors like Pitaya White or Black Granite may take longer to arrive. Cabinet measurement errors: Inaccurate measurements can delay fabrication and fitting. Design changes: Switching styles mid-process can push timelines back. Contractor scheduling: Conflicts with plumbing, electrical, or backsplash installation may cause gaps in progress. Speed tips: Confirm cabinet leveling, lock in your slab choice early, and coordinate with all contractors in advance. By avoiding these common pitfalls, you’ll reduce the risk of project setbacks and know more clearly how long it takes to install granite countertops. Careful planning makes the process smoother and helps you enjoy your new stone surface without stress. Expert Tips for a Smooth Granite Countertop Installation How long does it take to install granite countertops?  While the timeline depends on your project, there are smart steps you can take to make sure the installation goes as smoothly as possible. At SF Marble and Granite, we guide clients through each phase for a stress-free experience. Prepare your space: Clear the kitchen, disconnect appliances, and make sure the work area is accessible. Check cabinet stability: Cabinets must be secure and level to support heavy stone. Stay in touch: Communicate clearly with your fabricator and granite countertops installer about cutouts, edges, and finishes. Pick the right installer: Skilled professionals ensure efficiency and quality, saving you time in the long run. Whether you’re comparing quartz vs granite or even exploring materials like decomposed granite for other

How Long Does It Take to Install Granite Countertops? Read More »

how-to-install-dishwasher-with-granite-countertops​

How to Install Dishwasher with Granite Countertops

How to install dishwasher with granite countertops can be tricky because granite is strong but delicate when it comes to drilling or securing appliances. Unlike wood, you can’t simply screw into granite, which makes stabilizing a dishwasher a real challenge for many homeowners. At SF Marble and Granite Inc., we know the right techniques to keep your dishwasher secure without damaging your stone. In this guide, we’ll walk you through the step-by-step process, highlight the best mounting options, and share tips to make your installation smooth and safe. Tools and Materials Needed Installing a dishwasher on granite countertops requires special tools. Since granite can’t be drilled like wood can, special supports and adhesives will need to be in place in order to keep the unit stable without risking cracks. Granite brackets or adhesive kits – Secure dishwasher without drilling. Construction adhesive or epoxy – Strong bond for brackets. Plywood or wooden strip – Creates a safe, fastening surface. Metal strip or angle brackets – Adds extra support. Drill, screwdriver, screws – For cabinet attachments. Measuring tape, shims, level – Ensures alignment and balance. Using these tools helps protect your granite and ensures long-lasting installation. At SF Marble and Granite, we compare it to mounting an undermount sink; you rely on support systems, not direct drilling. Just like a decomposed granite pathway needs edging, a dishwasher under granite needs proper support. If you’re wondering how to attach dishwasher to granite countertop, these items will make the job easier and safer. Preparation Before Installation Before beginning the installation of a dishwasher on granite countertops, preparation is key. Granite surfaces may look attractive, but require careful handling during any appliance setup process. By taking the necessary steps ahead of time and following them to ensure a seamless setup experience. Measure the available space to confirm that your dishwasher fits properly. Turn off the water supply and electricity for safety before beginning any work. Review the manufacturer’s instructions, especially regarding side or top mounting options. These simple steps make the installation process easier and prevent damage to both the dishwasher and the countertop. Installing a dishwasher under granite is similar to working with popular granite colours like flawless granite or even elegant shades of gold; each requires attention to detail to preserve its beauty. If you’re wondering how to mount a dishwasher with granite countertops, the preparation stage is where it all begins. With careful measurements and safety precautions, you set the foundation for a secure and lasting installation. Mounting Methods for Granite Countertops Installing a dishwasher on granite countertops requires taking special care to avoid damaging its delicate surface. Unlike wood, which can be drilled into directly, granite cannot be drilled into directly. Instead, safe and effective techniques must be utilized. Below are some effective strategies. Adhesive Bracket Method Use granite-specific adhesive brackets. Attach brackets under the granite using a strong adhesive. Once cured, secure the dishwasher to the brackets. Wood Support Method Install a plywood strip beneath the granite using adhesive. Let the adhesive bond firmly. Screw the dishwasher tabs into the wood strip for stability. Metal Strip Support Method Place a metal angle strip between adjacent cabinets below the granite. Attach dishwasher tabs directly to the strip for a solid hold. Side-Mounting to Cabinets Use the manufacturer’s side-mounting tabs. Screw into the side cabinets instead of the granite. Safest option to avoid modifying the stone at all. Each of these methods protects your countertops while keeping your dishwasher secure. At SF Marble and Granite, we recommend options based on the type of stone you have, whether it’s polished or honed granite. Just as a trusted stone supplier advises the right material for your kitchen, choosing the proper mounting method ensures long-lasting performance. If damage ever occurs, professional granite repair services can restore your countertop. For homeowners asking about how to install a dishwasher granite countertop, these mounting methods are the safest and most reliable solutions. Step-by-Step Installation Process Installing a dishwasher on granite countertops requires both patience and the right method. Although granite is stylish and resilient, installation must be handled carefully to avoid cracks or chips during setup. Follow these steps for a safe and stable fit for your appliance. Position the Dishwasher – Slide the dishwasher carefully into the opening under your countertop, ensuring it aligns properly with the cabinets. Adjust Leveling Feet – Use the adjustable feet to make the dishwasher stable and perfectly level. This prevents vibration and water leaks. Attach with Chosen Mounting Method – Whether you use adhesive brackets, a wooden strip, a metal support, or side-mounting, secure the dishwasher without drilling into granite. Connect Water and Drain Lines – Attach the water supply hose and drain line tightly to avoid leaks. Reconnect Power – Safely restore electricity by plugging in the dishwasher or connecting it as directed by the manufacturer. These steps not only keep your granite safe but also ensure your dishwasher runs smoothly. At SF Marble and Granite, we often remind homeowners that the approach you take depends on the type of stone whether you have bold black granite, a popular grey shade, or a custom surface created through granite fabrication. If you’ve been searching for the best way how to fasten a dishwasher to granite countertops, following these step-by-step guidelines will give you a secure and professional installation. Final Adjustments and Testing After how to install a dishwasher with granite countertops, make sure everything is functioning as it should, and any necessary adjustments have been made at this point. Making small adjustments at this stage may prevent future issues as well as protect the granite from potential strain or stress damage. Check the Door Movement – Open and close the dishwasher door to confirm it swings smoothly without tipping forward. Confirm Alignment – Ensure the dishwasher sits flush with nearby cabinets for a seamless look. Tighten Brackets Carefully – Gently secure screws or brackets so the granite isn’t strained. Run a Test Cycle – Turn on a short cycle to

How to Install Dishwasher with Granite Countertops Read More »

how-to-install-an-undermount-sink-on-granite​

How to Install an Undermount Sink on Granite

How to install an undermount sink on granite is a question many homeowners ask when upgrading their kitchens for a sleek and modern look. Undermount sinks have become a popular choice because they create a seamless finish, make cleaning easier, and add a touch of elegance to granite countertops. At SF Marble and Granite Inc., we know that the success of this installation depends on precision and the right techniques. Properly securing the sink to granite ensures long-lasting durability, prevents water damage, and enhances both functionality and style. Whether you’re considering a DIY project or thinking about hiring a professional, understanding the process will help you achieve a safe, sturdy, and polished result. What Is an Undermount Sink? An undermount sink is a modern-style sink mounted below a countertop instead of sitting atop it, creating an inconspicuous appearance that works beautifully with granite surfaces. Homeowners looking to learn how to install an undermount sink on granite should take note that its popularity stems from what makes this style distinct from more conventional options. Key Features and Benefits Sleek and seamless appearance with no exposed rim Works best with professionally cut countertops Easy to clean, as spills can be wiped directly into the sink Strong and secure with proper clips and sealant Increases the overall value of your kitchen space When compared to drop-in sinks, undermount sinks stand out for their elegance and functionality. At SF Marble and Granite, a trusted granite stone supplier, we often recommend undermount sink installation to clients who want a durable, stylish, and easy-to-maintain option. Choosing this design not only enhances your granite countertops but also adds long-lasting value to your home. Tools and Materials You’ll Need Prior to beginning to install an undermount sink on granite, gathering all necessary tools and materials is the most crucial step. Being organized will streamline the installation process and help ensure a successful finish. Whether you’re working with classic kitchen granite countertops or luxurious gold granite, precision and preparation will give you the best results. Essential Tools and Supplies Safety gear (gloves, goggles) – Protect yourself while working with granite and adhesives. Clamps and supports – Hold the sink securely in place during installation. Epoxy adhesive and silicone sealant – Provide a strong bond and watertight seal. Measuring tape, drill, and mounting clips – Ensure accurate placement and secure attachment. Undermount sink and granite template – Guide the cutout and help align the sink perfectly. Having these materials ready before you install undermount sink on granite will save you time and reduce the chances of mistakes. Every detail matters when working with heavy stone surfaces, and preparation ensures both safety and precision. With the right tools in hand, you’ll be ready to move on to the installation process and achieve a professional finish that looks truly flawless. Preparation Before Installation Before starting the process of how to install an undermount sink on granite, it’s essential to prepare properly. Granite is a heavy and durable material, whether you’re working with white, honed, or black finishes. Taking the time to inspect, measure, and clean the area will make the installation stronger and longer-lasting. Skipping these steps can lead to poor alignment, leaks, or damage to your countertop. Key Preparation Steps Inspecting the granite countertop – Check for cracks, chips, or weak spots before beginning. Measuring and marking the cutout area – Ensure accurate sizing based on your sink template. Checking sink size and cabinet alignment – Confirm that the undermount sink fits within the cabinet frame. Cleaning the granite surface for adhesion – Remove dust, dirt, and residue to create a solid bond. Taking care with these details is the foundation of a successful installation. When considering how to mount undermount sink to granite, remember that precision at this stage saves time and prevents future issues. With the surface clean and measurements exact, you’ll be ready to move forward with confidence and achieve a professional, lasting result. Step-by-Step Guide: How to Install an Undermount Sink on Granite Learning how to install an undermount sink on granite requires patience and precision. Granite is a heavy, durable stone, and proper installation ensures both beauty and long-term function. Whether you’re working with granite countertops near Lowell, handling a fresh granite fabrication, or even doing a granite repair, these steps will guide you toward a successful undermount sink installation. Step 1: Measure and Cut the Opening Precision is key when working with granite. Use a sink template to outline your cutout on your countertop, so your sink fits seamlessly without gaps or misalignment. Step 2: Dry Fit the Sink Before applying adhesives, place the sink into its cutout to check its alignment with the cabinet below and ensure it sits evenly and in line. If faucet holes are required, mark them now to avoid mistakes later. Step 3: Apply Adhesive and Sealant Utilize an epoxy adhesive with silicone sealant and apply carefully around the cutout edges, providing both bonding strength and watertight sealing against moisture seepage. This step ensures proper adhesion of granite countertops over time. Step 4: Secure the Sink with Clips and Supports Attach undermount sink clips and support brackets to keep the sink securely in place while its adhesive sets, to prevent sagging – an especially crucial factor when installing heavy sinks under stone countertops. Step 5: Allow Adhesive to Cure Allow the adhesive to set according to its manufacturer’s recommended drying time. Delay connecting any plumbing until its bonds have completely set before proceeding with drain and faucet installations. After your sink has set properly, check its alignment and ensure it feels secure before moving forward with drain/faucet installations. Connecting Plumbing Fixtures Once you’ve mastered how to install an undermount sink on granite, the next step is connecting the plumbing fixtures. This stage ensures that your sink not only looks beautiful under your countertop but also functions perfectly for everyday use. Whether you’ve chosen a sleek pitaya white granite surface or a rustic decomposed granite style, a proper plumbing connection

How to Install an Undermount Sink on Granite Read More »

Scroll to Top