Installing a marble floor is a step-by-step process that involves preparing the surface, selecting the appropriate materials, laying the tiles correctly, and finishing with grouting and sealing. While it may seem challenging, anyone can achieve stunning results with proper planning, the right tools, and careful attention to detail. This comprehensive guide will walk you through every aspect of marble floor installation, from initial preparation to final maintenance, ensuring your project transforms your space into an elegant showcase.
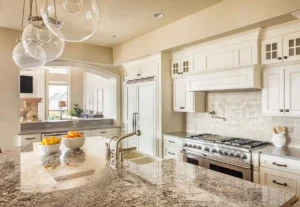
Marble flooring adds timeless beauty and luxury to any home, making it a popular choice for homeowners who want to create lasting impressions. Whether you’re renovating a bathroom, kitchen, or living area, understanding the proper tile installation process will help you avoid costly mistakes and achieve professional-looking results. Let’s explore how you can complete this rewarding home improvement project.
Table of Contents
ToggleUnderstanding Marble Floor Installation Basics
What Makes Marble Special for Flooring
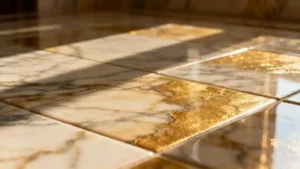
Marble is a natural stone that offers unique beauty with its distinctive veining patterns and elegant appearance. Unlike other flooring materials, marble requires specific installation techniques because of its porous nature and sensitivity to certain chemicals. The stone’s natural characteristics make each piece unique, which is why proper planning and careful handling, whether for floors or a vertical shiplap feature wall, are essential for successful installation.
Essential Tools and Materials You’ll Need
Before starting your marble floor installation project, gather these important tools and materials:
Basic Tools:
- Measuring tape and chalk line
- Notched trowel (3/16-inch recommended)
- Rubber mallet
- Tile spacers (1/8-inch)
- Wet saw with diamond blade
- Level and straight edge
- Sponges and clean cloths
Materials Required:
- Marble tiles or slabs
- High-quality thin-set mortar suitable for natural stone
- Penetrating sealer for marble
- pH-neutral grout (preferably Mapei Flexcolor CQ)
- Cleaning supplies designed for natural stone
Step-by-Step Marble Floor Installation Process
Step 1: Surface Preparation and Planning
The foundation of a successful installation of marble floor tile begins with proper surface preparation. Start by ensuring your subfloor is completely level, clean, and dry. Any bumps or dips in the surface will cause problems later, so use a leveling compound to smooth out imperfections. For concrete subfloors, make sure they have cured for at least 30 days to prevent moisture issues.
Next, create a detailed layout plan by measuring your room carefully and calculating the total square footage. Add 5-10% extra tiles to account for cutting waste and future repairs. This planning stage is crucial for determining your marble floor pattern and ensuring you have enough materials to complete the project.
Step 2: Finding the Center Point and Layout Lines
Mark the center of your room by measuring the midpoint of opposite walls and drawing chalk lines to create a grid48. These reference lines will guide your tile placement and ensure your marble floor pattern looks balanced and professional. Starting from the center prevents you from ending up with awkwardly cut tiles along the most visible walls.
Dry-lay several tiles along your reference lines to test your layout before applying any adhesive. This preview step allows you to make adjustments and ensures your pattern will work well in the space.
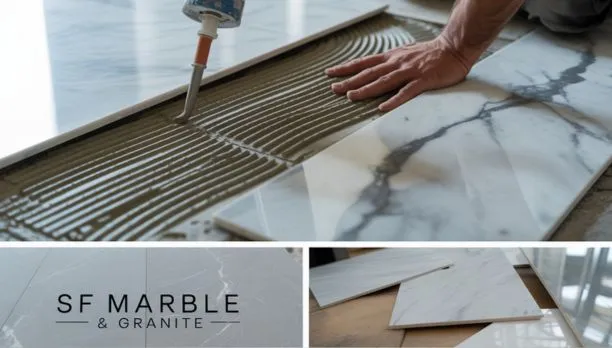
Step 3: Applying Thin-Set Mortar
Choose a high-quality thin-set mortar specifically designed for natural stone installation. Regular ceramic tile adhesives may not provide adequate support for marble’s weight and can cause discoloration. Mix your mortar according to the manufacturer’s instructions, preparing only what you can use within the working time.
Apply the thin-set to small sections (about 2×2 feet) using your notched trowel. Create even ridges in the adhesive by holding the trowel at a 45-degree angle4. This technique ensures proper coverage and prevents air pockets that could cause tiles to crack later.
Step 4: Setting the Marble Tiles
Begin placing your marble tiles at the intersection of your chalk lines, working outward in small sections. Press each tile firmly into the mortar with a slight twisting motion to ensure good contact. Use only gentle pressure from your palms – avoid using rubber mallets as they can create small cracks that will grow over time.
Insert tile spacers between each piece to maintain consistent gaps for grouting. Check that each tile is level with its neighbors using a straight edge, and make adjustments while the mortar is still workable. Remove any excess adhesive from the tile surface immediately, as it becomes very difficult to clean once it hardens.
Step 5: Cutting Tiles for Edges and Obstacles
When you reach walls, doorways, or other obstacles, you’ll need to cut tiles to fit. Use a wet saw with a diamond blade designed for natural stone to make clean, precise cuts. Measure each cut carefully and mark your cutting lines clearly before making any cuts.
Always wear safety equipment, including eye protection and gloves, when cutting marble tiles. The wet saw helps prevent dust and reduces the risk of chipping, but proper technique is still essential for good results.
Creating Beautiful Marble Floor Patterns
Popular Pattern Options for Marble Floors
The marble floor pattern you choose significantly impacts the overall look of your space. Some popular options include:
Straight Lay Pattern: The simplest approach, where tiles are laid in straight rows, is perfect for beginners. This classic pattern works well in any room and makes spaces appear larger.
Diagonal Pattern: Tiles are set at a 45-degree angle to the walls, creating visual interest and making rooms appear wider. This pattern requires more cutting but produces stunning results.
Herringbone Layout: Rectangular tiles are arranged in a zigzag pattern that adds sophistication and movement to your floor. This pattern works especially well with longer marble tiles in a herringbone layout.
Mosaic Patterns: Small marble pieces create intricate designs and artistic touches. These patterns require more time but offer unlimited creative possibilities.
Tips for Pattern Success
When planning your marble floor pattern, consider the size of your room and the tile dimensions. Larger patterns work better in spacious areas, while smaller patterns suit compact spaces. Remember that more complex patterns require additional cutting and planning time, so factor this into your project timeline.
Grouting and Sealing Your Marble Floor
The Grouting Process
After your tiles have set for at least 48 hours, you can begin grouting. Use a pH-neutral grout specifically designed for natural stone, as acidic grouts can damage marble surfaces. Mix your grout according to package directions and work in small sections to prevent it from hardening before you can clean excess material.
Apply grout with a rubber float, pressing it firmly into the joints at a 45-degree angle. Work diagonally across the tiles to ensure complete joint filling. Clean excess grout from tile surfaces immediately using a damp sponge, rinsing frequently to avoid leaving a hazy residue.
Sealing for Protection
Marble must be sealed to protect it from stains and moisture damage. Apply a penetrating sealer designed for natural stone before grouting to prevent grout stains. These sealers soak into the stone to create protection from within while maintaining the marble’s natural appearance.
Follow the sealer manufacturer’s instructions carefully, applying thin, even coats until the stone is fully saturated. Wipe away any excess sealer before it dries to prevent a waxy film on the surface. Allow the sealer to cure completely (typically 1-2 days) before proceeding with grouting.
Marble Design on Wall Applications
Extending Your Floor Pattern to Walls
Creating a marble design on wall surfaces can complement your new floor beautifully. Wall applications require slightly different techniques, including the use of tile backer board in wet areas and proper support for the stone’s weight. Consider extending your floor pattern partway up walls as wainscoting or creating accent walls behind vanities or in shower areas.
When planning wall installations, ensure your surface is stable and even. In dry areas like living rooms, marble can be installed directly over drywall, but wet areas require proper waterproofing and substrate preparation. The marble design on wall surfaces adds luxury and creates visual continuity with your floor installation.
Maintenance and Care for Your Marble Floor
Daily Cleaning Routines
Proper maintenance begins immediately after installation. Sweep or dry mop daily to remove dirt and grit that can scratch the marble surface. Use only pH-neutral cleaners designed for natural stone, avoiding acidic products like vinegar or lemon juice that can etch the surface.
For weekly cleaning, damp mop with warm water and a marble-specific cleaner, working in small sections. Always dry the floor thoroughly after cleaning to prevent water spots and mineral deposits. Clean spills immediately, especially dark liquids like coffee or wine, as marble absorbs stains quickly.
Long-Term Protection Strategies
Reapply penetrating sealer every 6-12 months, depending on foot traffic and use patterns. High-traffic areas may need more frequent sealing, while low-use spaces can go longer between applications. Place mats at entrances to reduce dirt and moisture, and use felt pads under furniture to prevent scratches.
Avoid placing metal objects directly on marble surfaces, as they can cause scratches and rust stains. In kitchens and bathrooms, wipe up spills quickly and ensure good ventilation to minimize moisture exposure.
Common Installation Mistakes to Avoid
Planning and Preparation Errors
Many installation problems stem from inadequate preparation. Skipping surface preparation leads to uneven tiles and long-term damage. Always ensure your subfloor is properly cured, level, and clean before beginning installation. Rushing the planning stage often results in poor layout choices and insufficient materials.
Research your specific marble type and its requirements before starting. Different marbles have varying characteristics and may need specialized installation techniques. Understanding your stone’s properties helps you choose appropriate adhesives and sealers.
Material and Technique Mistakes
Using the wrong adhesive is a common error that can cause discoloration or weak bonds. Always choose thin-set mortars specifically designed for natural stone installation. Avoid mastic adhesives, which are suitable for ceramic tiles but not for marble.
Improper sealing techniques can leave your marble vulnerable to stains and damage. Don’t skip the pre-grout sealing step, and ensure complete coverage when applying sealers. Inadequate joint spacing can cause tiles to crack as the substrate expands and contracts.
Cost Considerations and Budgeting
Understanding Marble Floor Installation Costs
The total cost of marble floor installation varies significantly based on several factors. Basic marble tiles typically cost $5-10 per square foot, while premium options can reach $20-47 per square foot. Professional installation adds $10-20 per square foot to the total project cost.
Grade A marble offers the highest quality with fewer flaws and stronger structure, but comes at a premium price. Lower grades may require additional repairs and filling, which can affect long-term appearance and durability. Factor in costs for underlayment, adhesives, grout, sealers, and tools when budgeting your project.
Getting the Best Value
Invest in quality materials and proper tools to ensure lasting results. While premium marble costs more upfront, it typically offers better durability and appearance over time. Consider hiring professionals for complex patterns or large areas if you’re uncertain about your skills.
Purchase 10-15% extra material to account for cutting waste and future repairs. This investment provides peace of mind and ensures you have matching tiles available if replacements are needed later
Elevate Your Space with Professional Backsplash Installation
Looking to add a touch of elegance and easy-to-clean style to your kitchen or bathroom? Our expert backsplash installation service brings your vision to life with precision and care. At SF Marble & Granite Inc., we specialize in installing stunning marble, granite, and tile backsplashes that not only protect your walls but also serve as a beautiful focal point in any room. From preparing the surface and selecting the perfect materials to precise cutting and flawless placement, our team handles every detail so you can enjoy a seamless, durable finish. Whether you want a classic subway tile look or a luxurious marble slab design, trust us for your next backsplash installation and experience the difference that true craftsmanship makes. Let us help you transform your space with a backsplash that’s as functional as it is breathtaking.
Conclusion
Installing a marble floor successfully requires careful planning, proper materials, and attention to detail throughout the tile installation process. From initial surface preparation through final sealing, each step contributes to the long-term beauty and durability of your investment. With the right approach and patience, you can achieve professional-quality results that will enhance your home’s value and elegance for years to come.
Remember that marble flooring is not just about installation; ongoing maintenance and care are essential for preserving its natural beauty. By following proper cleaning routines and resealing schedules, your marble floor will continue to impress visitors and provide lasting satisfaction. Whether you choose a simple straight-lay pattern or an elaborate mosaic design, the timeless appeal of marble makes it a worthwhile investment in your home’s future.
FAQs
How long does it take to install a marble floor?
A typical marble floor installation takes 3-5 days for a standard room, including preparation, setting, grouting, and sealing. Complex patterns or large areas may require additional time.
Can I install marble tiles over existing flooring?
In most cases, existing flooring should be removed to ensure proper adhesion and prevent height issues. However, stable, level surfaces like concrete may allow direct installation over existing materials.
What’s the difference between marble tiles and marble slabs for flooring?
Marble tiles are smaller pieces (typically 12″x12″ to 24″x24″) that are easier to handle and install. Marble slabs are larger, heavier pieces that cost more but provide fewer grout lines.